Self Hosted Deployment Guide
This tutorial shows how to deploy GitNotebooks Self-Hosted
Before we start the tutorial
The tutorial is divided into several sections:
- Choosing an Endpoint
- Creating a GitHub App
- Creating a Database
- Reviewing the Environment Variables
- Deploy container
The goal is to create a set of environment variables that look like this:
BASE_URL=https://gitnotebooks.mycompany.com
GITHUB_BASE_URL=https://github.mycompany.com/api/v3
GITHUB_APP_IDENTIFIER=499732
GITHUB_CLIENT_SECRET=0f2e9190d598624847d2b259b5b567cf981d5072
GITHUB_PRIVATE_KEY=LS0tLS12dJQkFNB2s3emt2dBS0nRzbXQzVCRUdJUUVBc2pzNFRSb0ErUVdWdMbFZUeklyQmtkYkZFURSBTXZiZnlqQW9FHU0EgUFJJVk1YWZWUGxaV1NOKUTiBSbNi9HOUTV0YLRVktLS0tLQpCg==
GITHUB_WEBHOOK_SECRET=d1ae70aaf90bd909ce44927350d9aba8c1136d34
GITHUB_APP_URL=https://github.mycompany.com/apps/gitnotebooks-self-hosted
GITHUB_CLIENT_ID=Iv1.fed2b15afabbc1a6
DATABASE_URL=postgresql://postgres:somepassword@git-notebooks.database.url.rds.amazonaws.com:5432/postgres
AES_ENCRYPTION_KEY=X9CSf8y7Pw9dYSJNUwV4L7jUqH42/Mb27pHBRTUWceI=
ENTERPRISE=true
LICENSE_KEY=eg7d1aba4ddb88f2ec16711d96a25d0c03
In this tutorial, we'll denote environment variables with this notation: SOME_ENV_VAR
Once the environment variables are set correctly, you can run the GitNotebooks container. Here's an example using Docker:
docker run -p 80:3000 --env-file .env gitnotebooks/self-hosted:1.0.0
Prerequisites
We'll assume that you have enough permission to create a new GitHub app and a Postgres database. We'll also assume that you have access to the private GitNotebooks container image.
If you have not yet received the GitNotebooks container image, you can do so by filling out this form: Self-hosted signup
This is a multi-platform container image. So if you're pulling the image onto a machine with a different architecture than the one used in the deployment (e.g. to mirror the image to your own container registy), take care to make sure the correct platform is used when pulling the image, otherwise you will run into a exec format error.
# Example command to mirror image version 1.3.5 to a private container registry.

# linux/arm64
skopeo copy \
  --src-creds "$SRC_USER:$SRC_PASS" \
  --dest-creds "$DEST_USER:$DEST_PASS" \
  --override-os=linux \
  --override-arch=arm64 \
  docker://docker.io/gitnotebooks/self-hosted:1.3.5 \
  docker://registry.example.com/gitnotebooks/self-hosted:1.3.5-arm64

# linux/amd64
skopeo copy \
  --src-creds "$SRC_USER:$SRC_PASS" \
  --dest-creds "$DEST_USER:$DEST_PASS" \
  --override-os=linux \
  --override-arch=amd64 \
  docker://docker.io/gitnotebooks/self-hosted:1.3.5 \
  docker://registry.example.com/gitnotebooks/self-hosted:1.3.5-amd64
Choosing an Endpoint
The GitNotebooks web application needs to be accessible via a URL. This URL will be referred to as the BASE_URL throughout the setup process. You'll need to decide on this BASE_URL before proceeding.
The BASE_URL will be used as an environment variable in your configuration. For example, it might look like:
BASE_URL="https://gitnotebooks.yourcompanydomain.com"
Creating a GitHub App
First, navigate to your GitHub Organization > Settings > Developer Settings > GitHub Apps > New GitHub App. If you need help finding this button, the GitHub docs can help: Registering a GitHub App Here’s how to fill out the form:


You should now have a GitHub App with the following settings:
- GitHub App Name:
GitNotebooks - Homepage URL:
https://gitnotebook.com - Callback URL:
https://gitnotebooks.your-domain.com/api/auth/callback/github - Post installation:
https://gitnotebooks.your-domain.com/dashboard - Webhook URL:
https://gitnotebooks.your-domain.com/api/event_handler - Webhook secret: A custom webhook seceret
- Permissions
- Checks:
Read only - Contents:
Read and write - Pull requests:
Read and write - Email address:
Read only
- Checks:
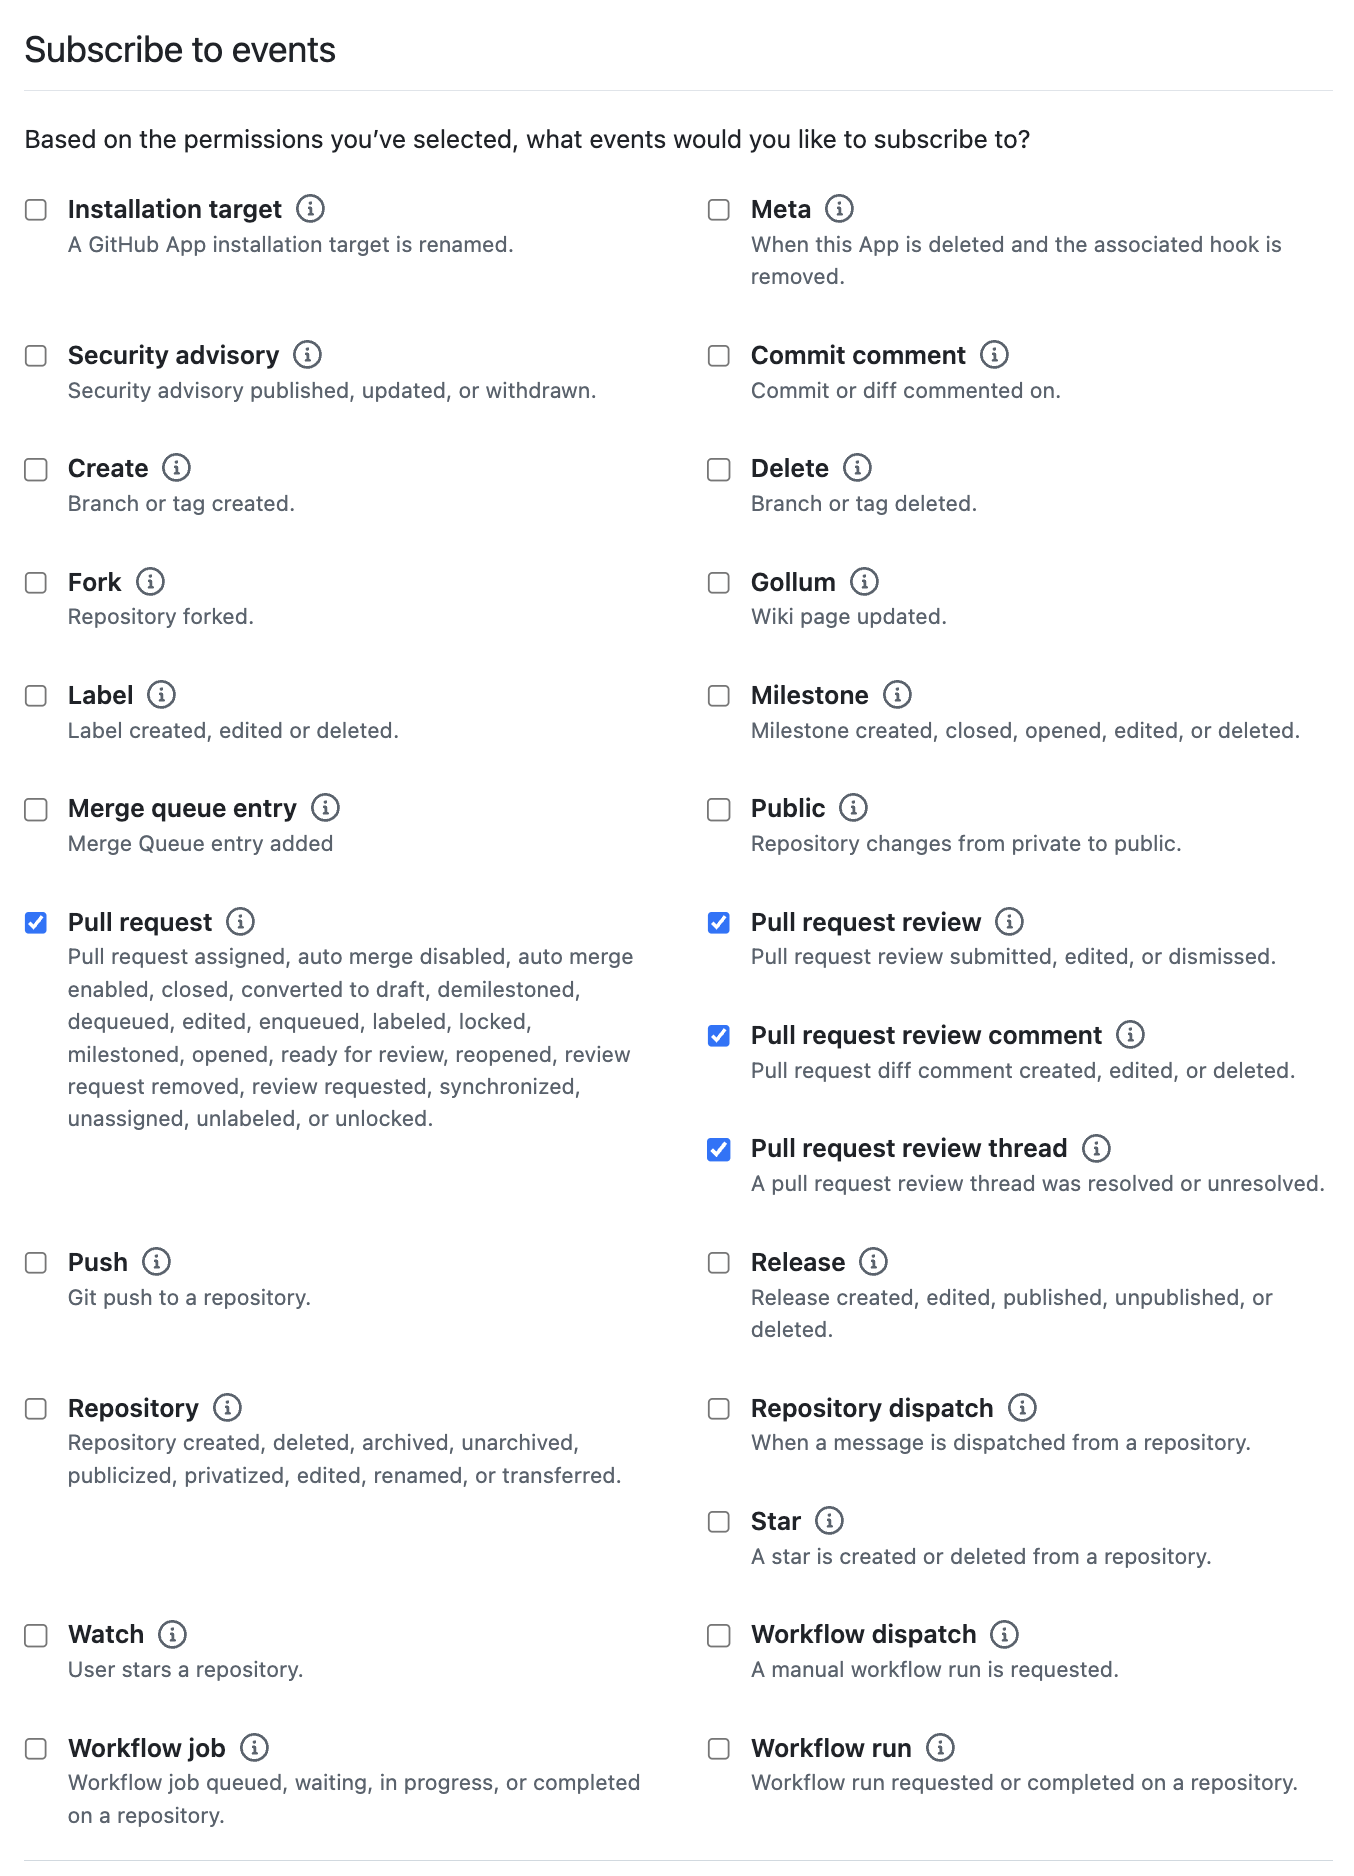
- Subscribe to events:
- Pull request
- Pull request review
- Pull request review comment
- Pull request review thread
After creating the GitHub App
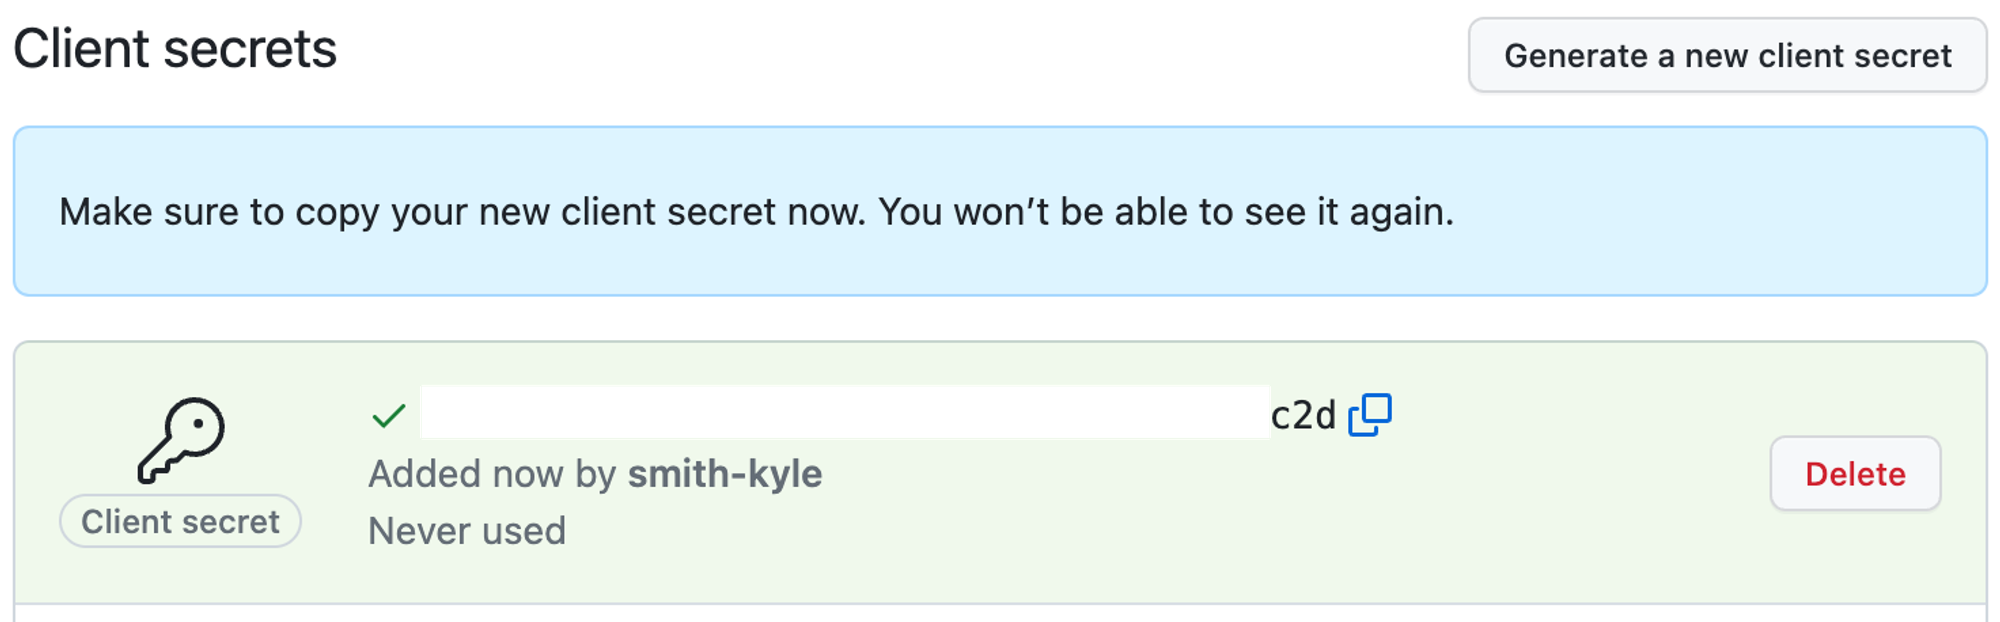
We'll need to collect some information for GitNotebooks to identify itself as the GitHub App.
Generate a new client secret GITHUB_CLIENT_SECRET
Generate a private key We will download the key, then convert it to base64.
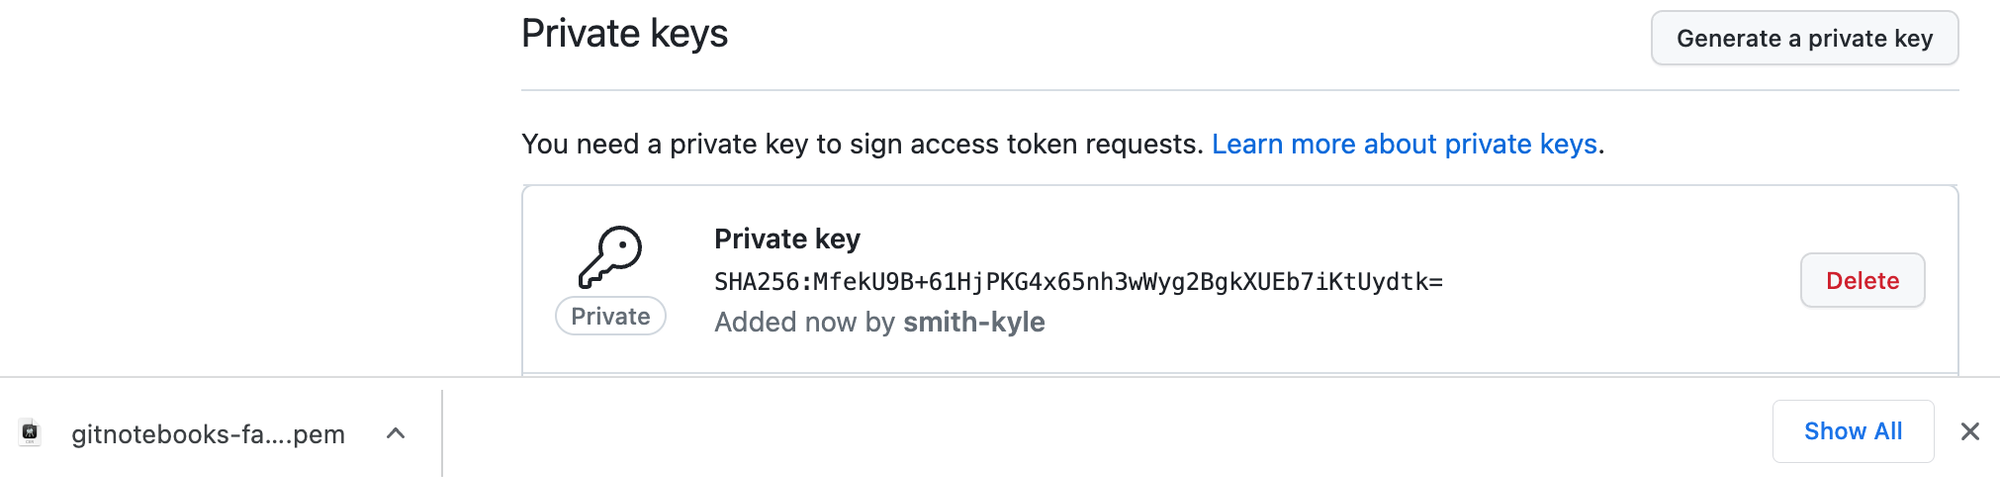
Convert the key to base64.
cat path/to/your/key.pem | base64
Note the url of the public page GITHUB_APP_URL
This URL is used to direct users to add repos to the GitHub app installation.

Making it pretty (optional)
Finally, you can upload a logo which is used as the app's avatar.
Creating a database
Next, we need a Postgres database with the following specifications:
- 1GB RAM
- 20GiB storage
- PostgreSQL 9.4 or higher
- Username/Password authentication
We recommend that your database not be accessible to the internet, and restrict inbound connections to the web servers hosting the container over TCP port 5432.
Note the connection string, which is the DATABASE_URL
DATABASE_URL="postgresql://USER:PASSWORD@HOST:PORT/DATABASE"
GitHub Enterprise Server Considerations
User avatars may not be visible for GitHub Enterprise Server users due to a limitation of GitHub: GitHub Issue.
However, you can use initial instead of avatars by setting the USE_INITIALS_FOR_AVATARS=true environment variable.
Reviewing the Environment Variables
We should have all the environment variables we need:
# From `Choosing and Endpoint`
BASE_URL=https://gitnotebooks.mycompany.com

# From `Creating a GitHub App`
GITHUB_APP_IDENTIFIER=499732
GITHUB_CLIENT_ID=Iv1.fed2b15afabbc1a6
GITHUB_CLIENT_SECRET=0f2e9190d598624847d2b259b5b567cf981d5072
GITHUB_PRIVATE_KEY=LS0tLS12dJQkFNB2s3emt2dBS0nRzbXQzVCRUdJUUVBc2pzNFRSb0ErUVdWdMbFZUeklyQmtkYkZFURSBTXZiZnlqQW9FHU0EgUFJJVk1YWZWUGxaV1NOKUTiBSbNi9HOUTV0YLRVktLS0tLQpCg==
GITHUB_WEBHOOK_SECRET=d1ae70aaf90bd909ce44927350d9aba8c1136d34
GITHUB_APP_URL=https://github.mycompany.com/apps/gitnotebooks-self-hosted

# Base URL of your GitHub API. If you are not self-hosting GitHub, simply use https://api.github.com
# If you are using GitHub Enterprise Server use https://mycompany.github.com/api/v3
GITHUB_BASE_URL=https://api.github.com

# From `Creating a database`
DATABASE_URL=postgresql://postgres:somepassword@git-notebooks.database.url.rds.amazonaws.com:5432/postgres

# Generate this value using `openssl rand -base64 32`
AES_ENCRYPTION_KEY=X9CSf8y7Pw9dYSJNUwV4L7jUqH42/Mb27pHBRTUWceI=

# License keys are provided by GitNotebooks
LICENSE_KEY=eg7d1aba4ddb88f2ec16711d96a25d0c03

ENTERPRISE=true
You are now ready to deploy GitNotebooks Self-Hosted.
Deploying the GitNotebooks Container
The final step is to deploy the GitNotebooks container image with the environment variables we've prepared. Here are some key points to consider:
- The container image serves traffic over port 3000, which should be mapped to port 80 on the host.
- A health check endpoint is available at
/api/health. This endpoint verifies the web application's connection to the database and confirms that the environment variables are properly set. - We recommend a resource request of
250Mimemory100mCPU. We also recommend not setting CPU and memory limits to allow for increased CPU during redeployments.
To deploy the container, use your preferred container orchestration platform (e.g., ECS, Kubernetes) and ensure that the necessary port mapping, environment variables, and CPU/memory requests are configured.
Security Recommendations
While GitNotebooks Self-Hosted only makes network requests to GitHub, we recommend implementing the following security measures:
-
Web application servers:
- Store container environment variables as secrets (e.g., using AWS Secrets Manager)
- Restrict outbound network traffic to GitHub and the database
- Limit inbound traffic to your corporate VPN
-
Database:
- Implement encryption at rest
- Require SSL connections from the web server
- Restrict inbound connections to web servers via TCP port 5432
- Disable all outbound network requests
-
Application load balancer:
- Limit inbound requests to your corporate VPN and GitHub Webhooks
- Restrict outbound requests to the web application