Getting Started
Welcome to GitNotebooks! Before diving into the installation process, we recommend checking out our demo pull request. This allows you to try GitNotebooks without setting up a repository or installing the app. 👉 Try our demo pull request
Installation
Getting GitNotebooks up and running is quick and easy. Follow these simple steps:
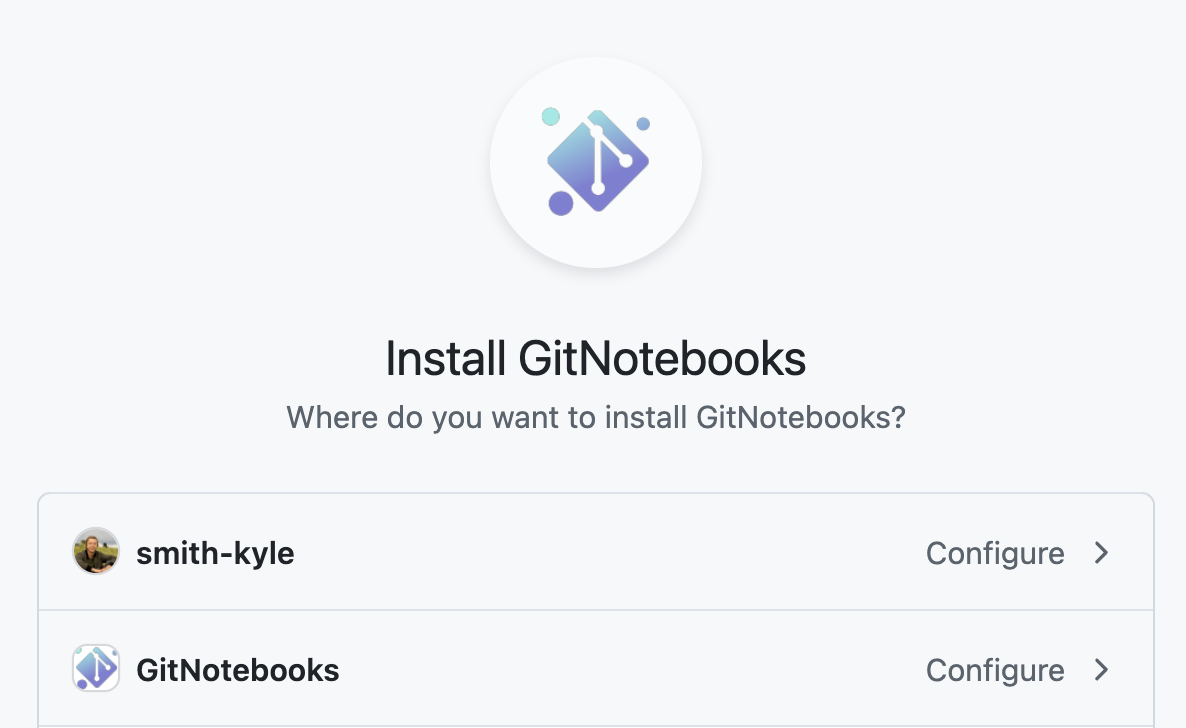
- Sign in to the GitNotebooks dashboard
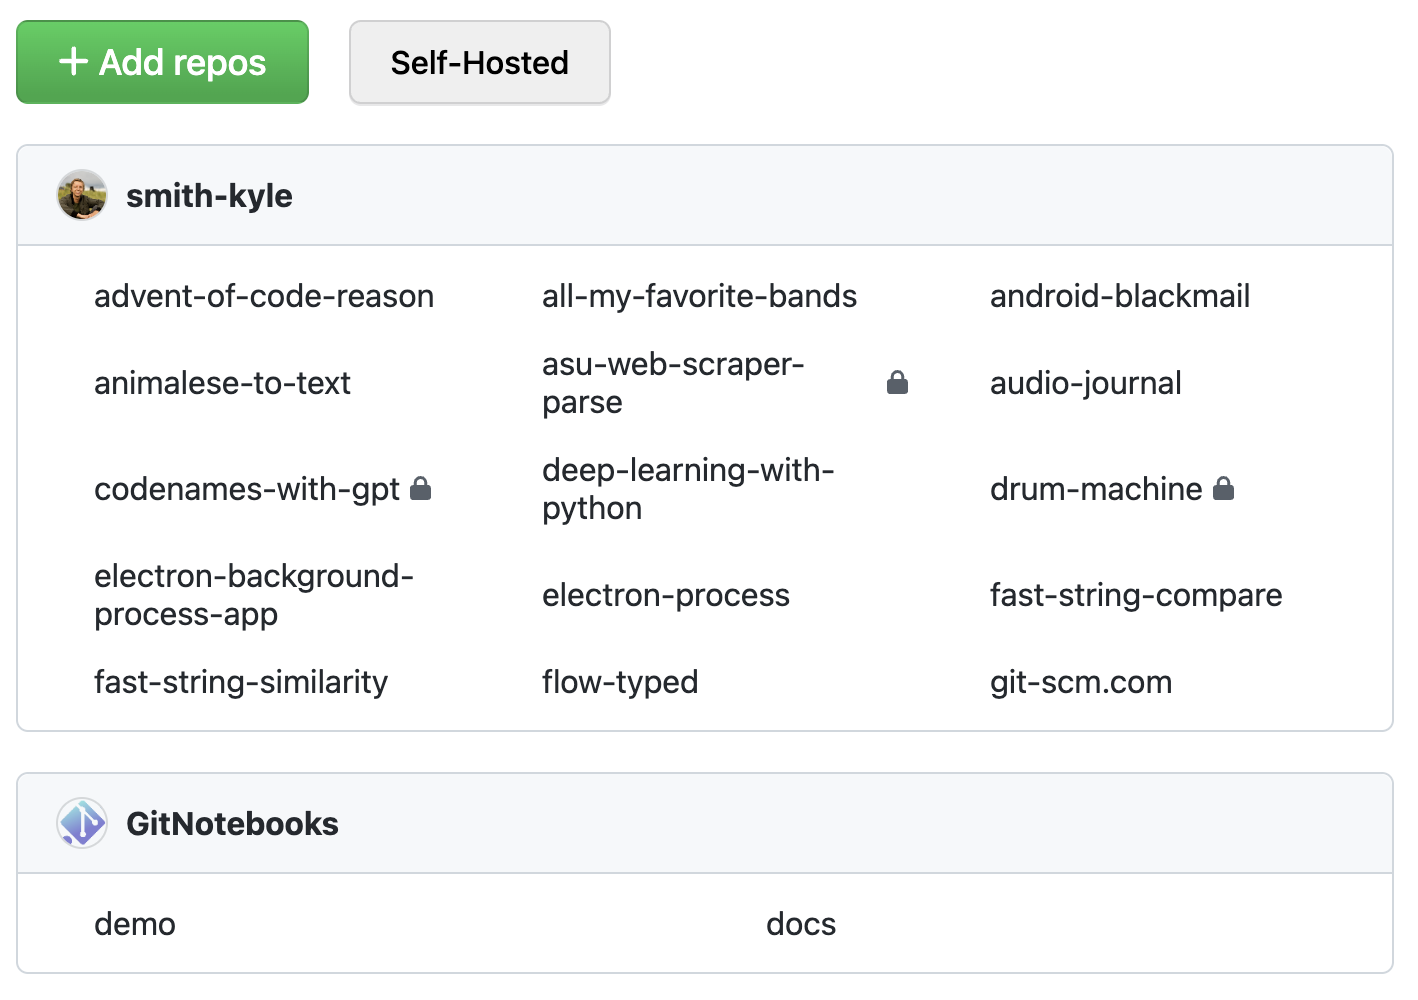
- Click
Add Repo - Select the repositories
Sign in

Add Repo

Select Repos
Start Reviewing
The entire process takes about a minute!
Can't install GitNotebooks in your GitHub Organization?
You may not have the required permissions to install GitNotebooks. You can ask your GitHub Organization admin to install GitNotebooks or request a self-hosted version.
Review a Notebook
Now that you've installed GitNotebooks, you're ready to start reviewing notebooks. Our Reviewing a Notebook guide will walk you through the process, showing you how to open pull requests, and make comments on both code and markdown.
Questions or Feedback
We're here to help! If you need support or have any questions, feel free to reach out to us at support@gitnotebooks.com. You can also post an issue to our public repository for feature requests or bug reports.
Reviewing a Notebook
This guide will walk you through the process of reviewing Jupyter notebooks using GitNotebooks. We'll cover how to add comments, understand diffs, and submit reviews.
Viewing a Notebook Change
When you open a new pull request that includes changes to Jupyter notebooks, GitNotebooks automatically adds a comment to your pull request. This comment contains a link inviting you to review the notebooks using GitNotebooks.

Adding and Viewing Comments
Once you have opened up a review in GitNotebooks, you can add comments to both code and markdown cells.
Code Comments
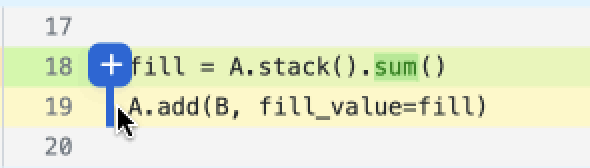
You can add single-line or multi-line comments on either the left or right side of the code.
Markdown Comments
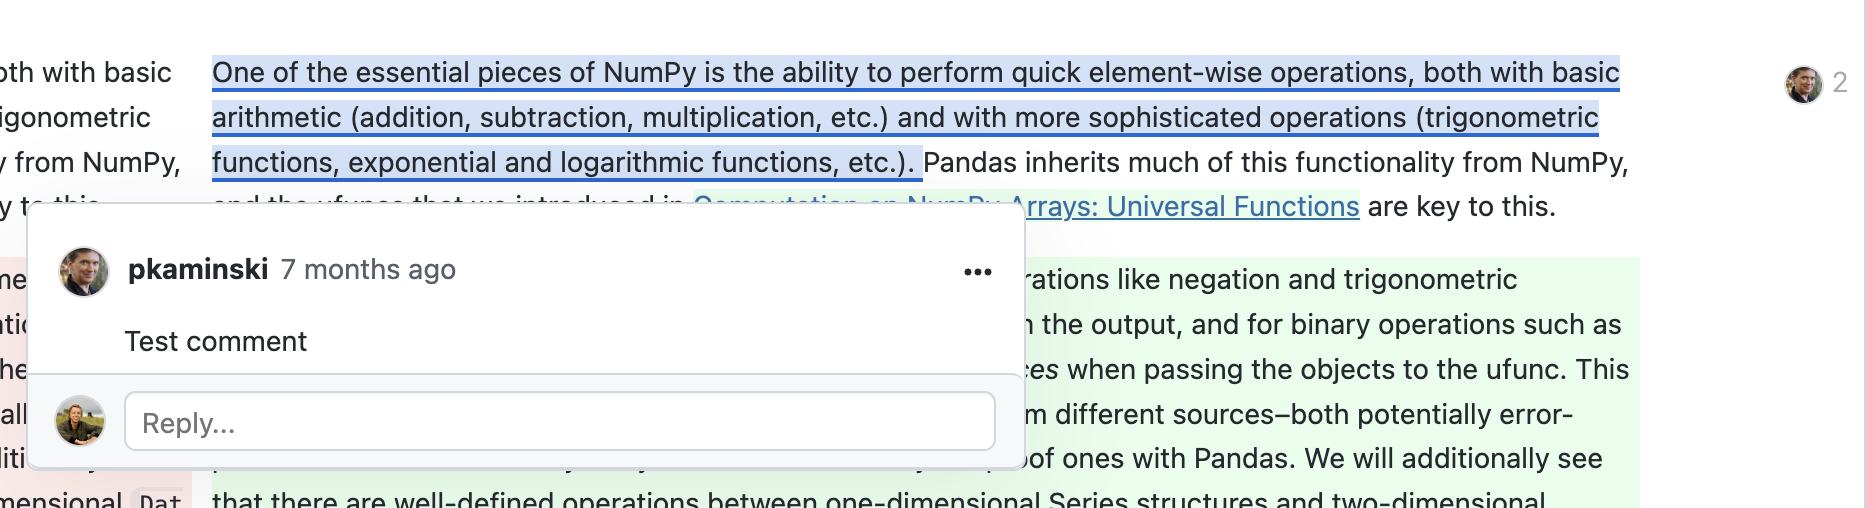
To comment on markdown, simply click directly on the markdown text. Each markdown comment is associated with a specific line in the markdown, ensuring your feedback is always in context.
When a comment is added to markdown, a blue underline will appear. To view the comment and respond, click the markdown or the avatar to the right.
You can view markdown diffs in both rendered and raw formats, giving you the option to review the content in the way that works best for you. To learn more see our settings docs
Notes About Comments
Comments will stay in place as new commits are pushed to the branch.
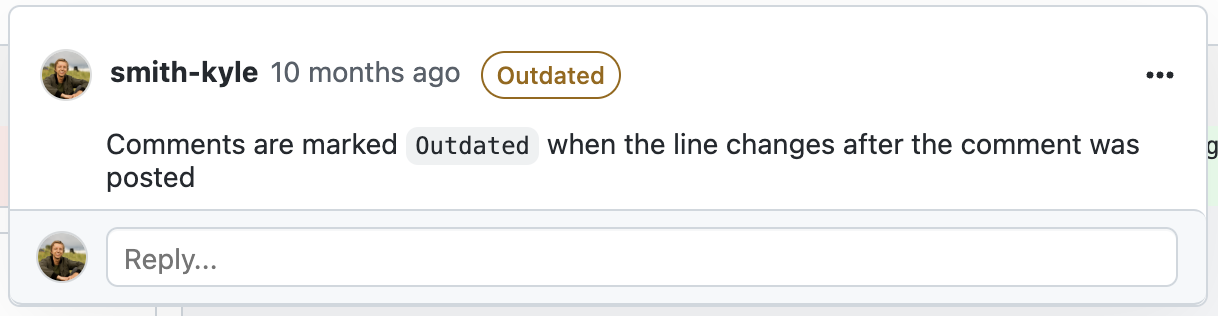
Comments are automatically marked as outdated if a new commit changes the specific line since the comment was added.
Viewing Diffs
GitNotebooks supports a variety of diffs to make your review process comprehensive:
- Rendered and raw markdown diffs
- Code diffs
- Dataframe output diffs
- Text output diffs
- Chart and image change detection
Code Diffs
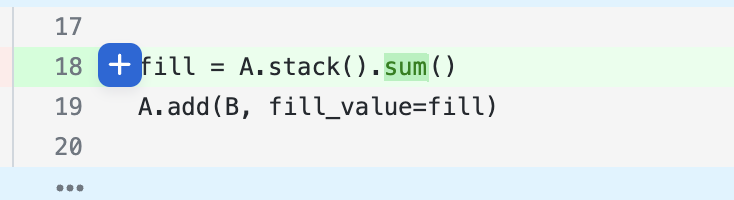
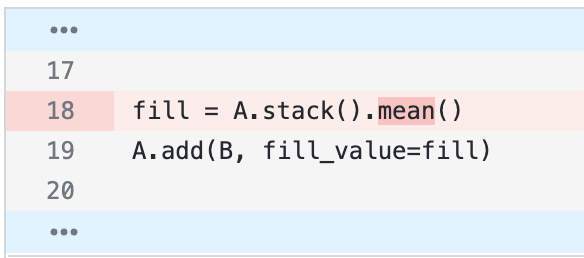
Code diffs are rendered similarly to GitHub.
Context around the changed line is collapsed. Click the blue line to expand the diff context.
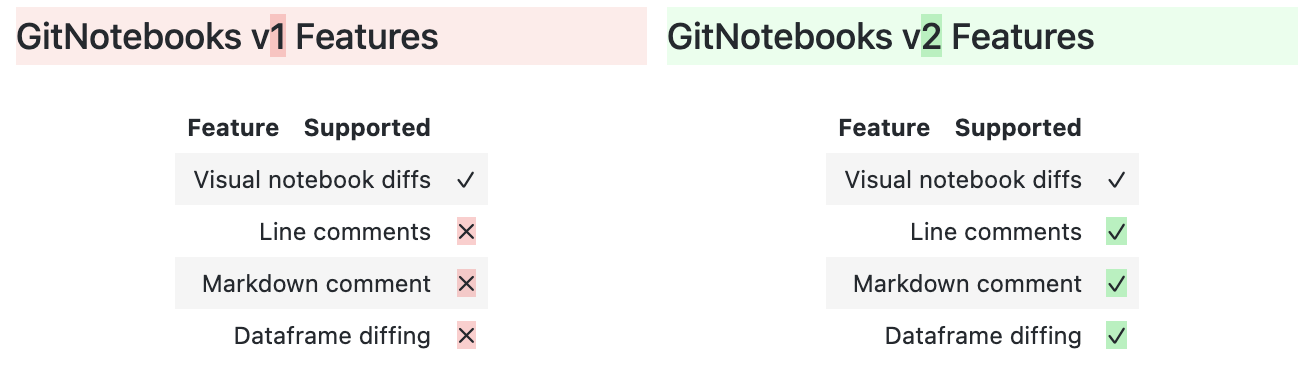
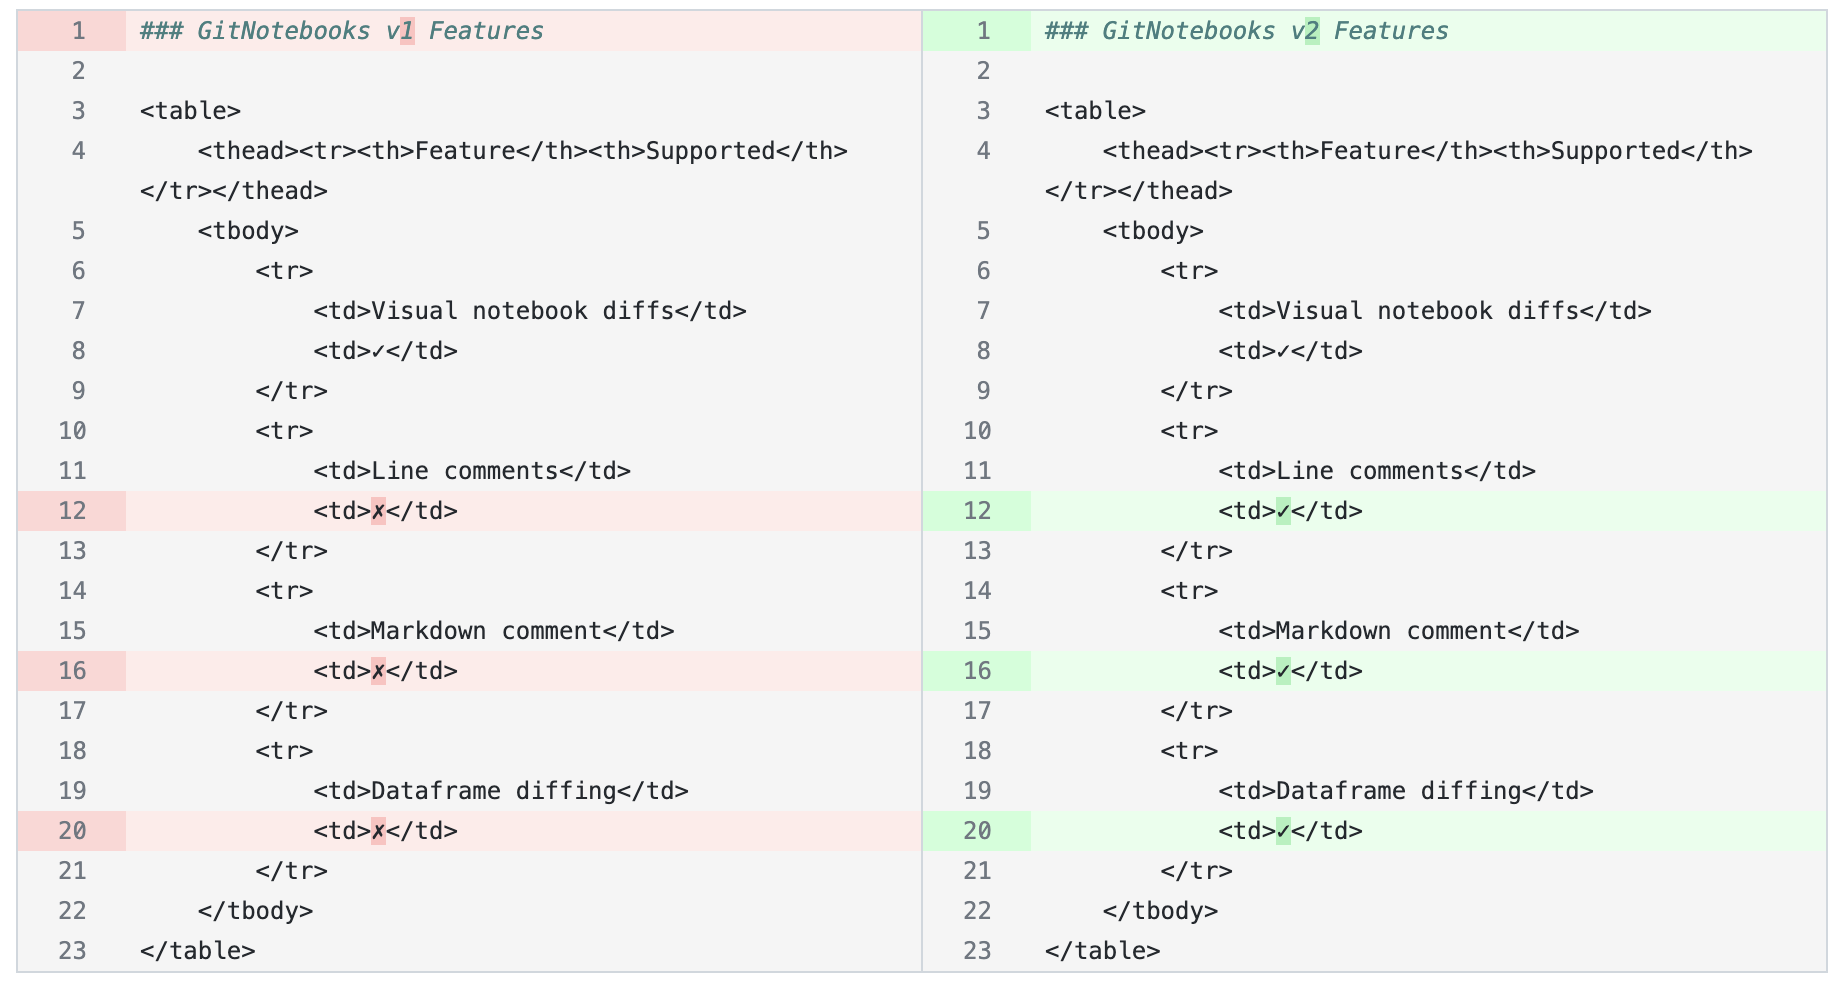
Markdown Diffs
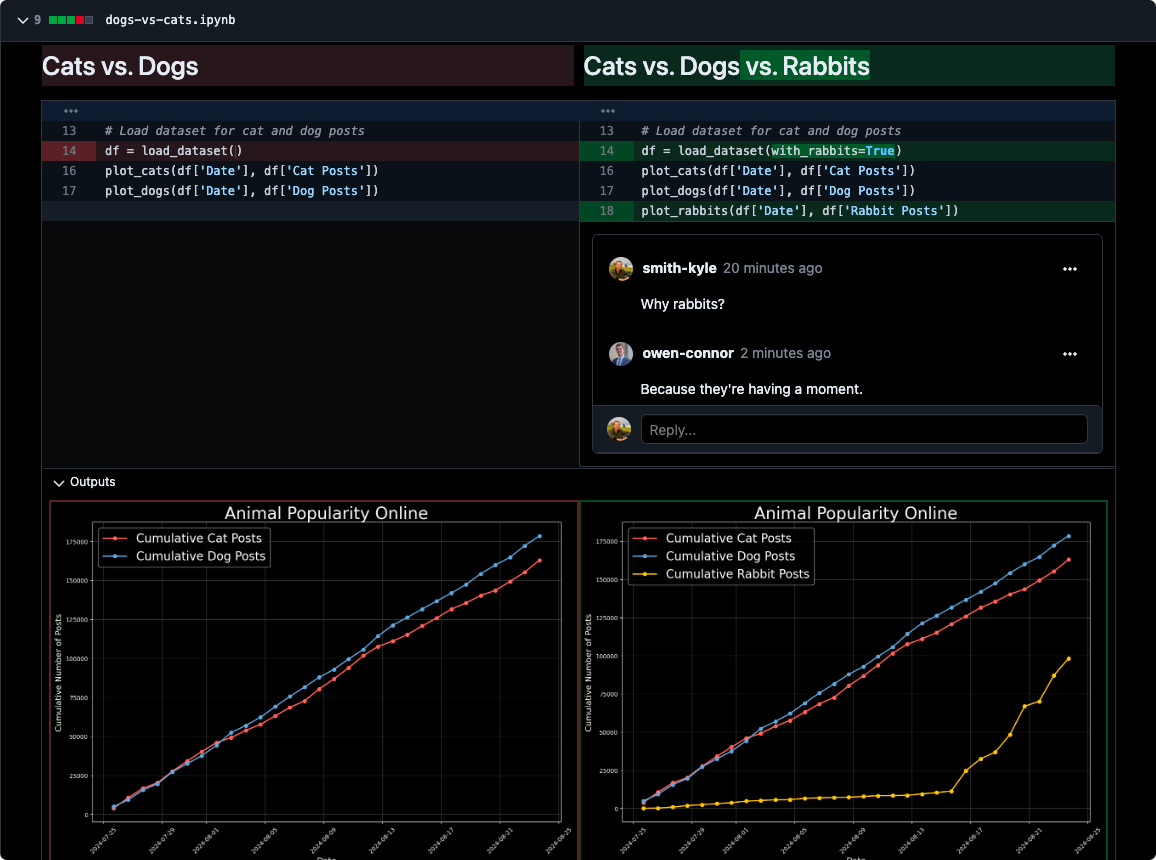
Markdown diffs are presented in both rendered and raw formats, allowing you to see both the visual changes and the underlying markup modifications.
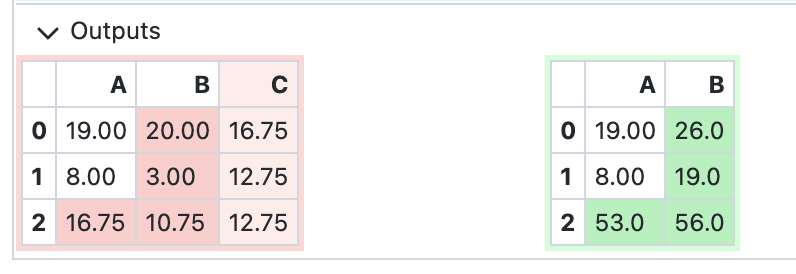
Output Diffs
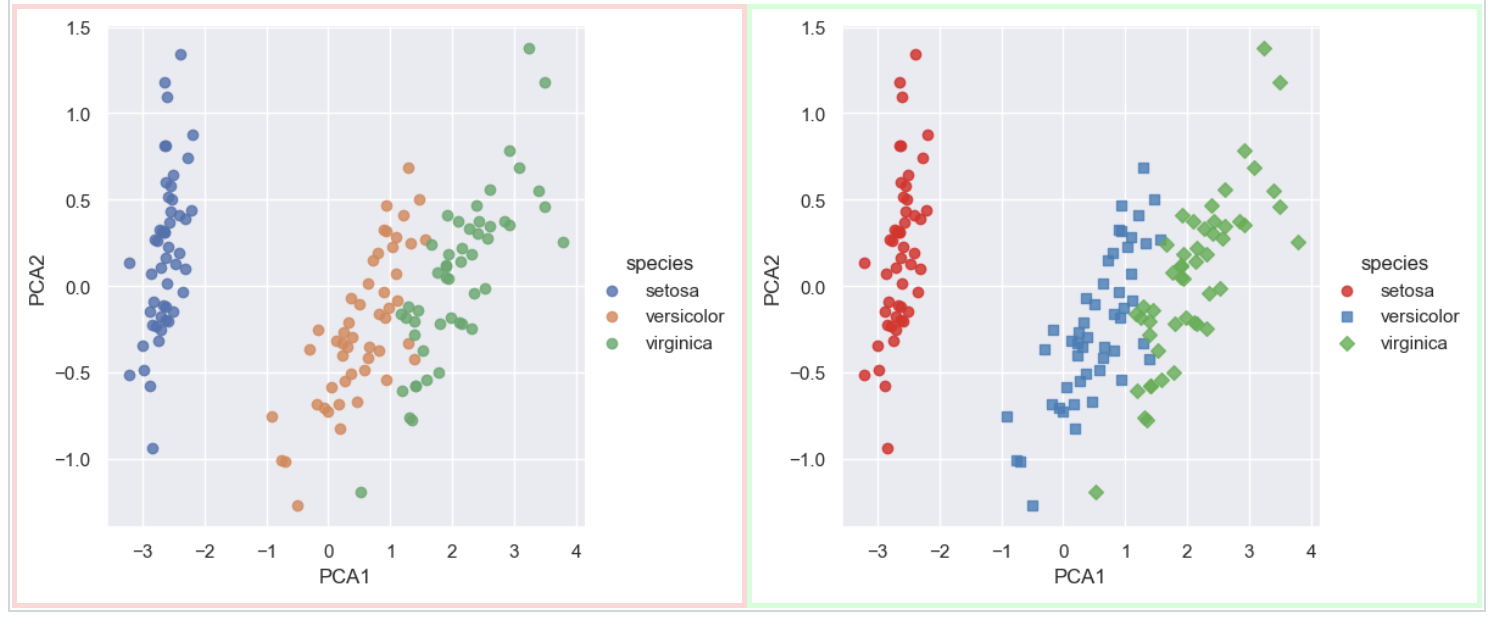
Output diffs are useful when reviewing changes in notebook results. This includes changes in dataframes, text outputs, charts, and images.
Dataframe Diff
Text Output Diff
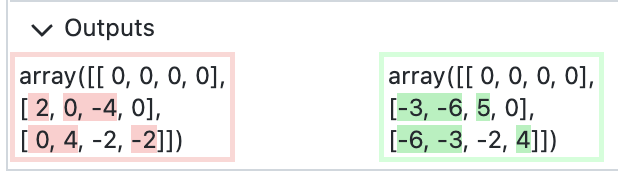
Chart Diff
Submitting a Pull Request Review
To submit your review in GitNotebooks:
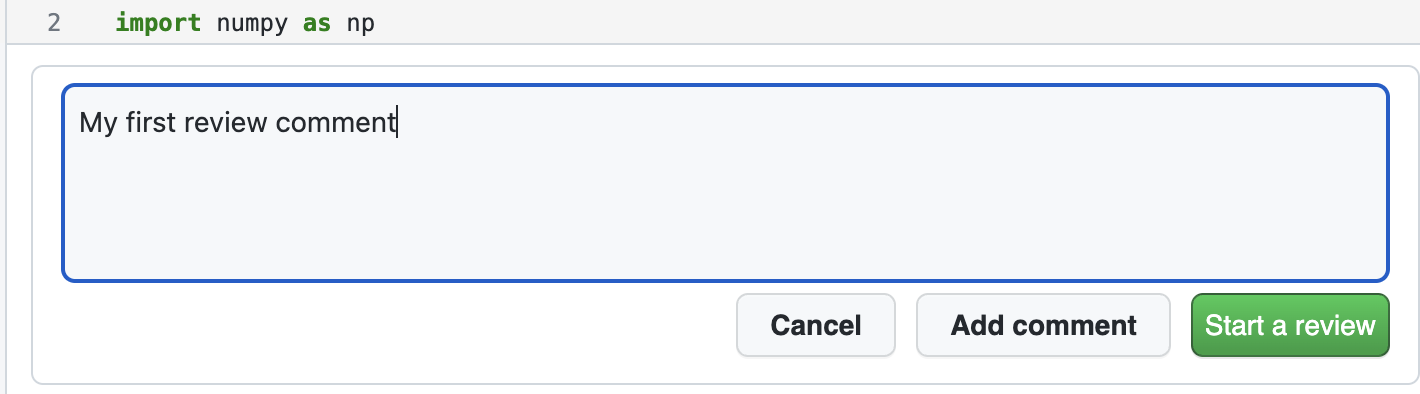
- Click the "Start a review" button on any comment you make.
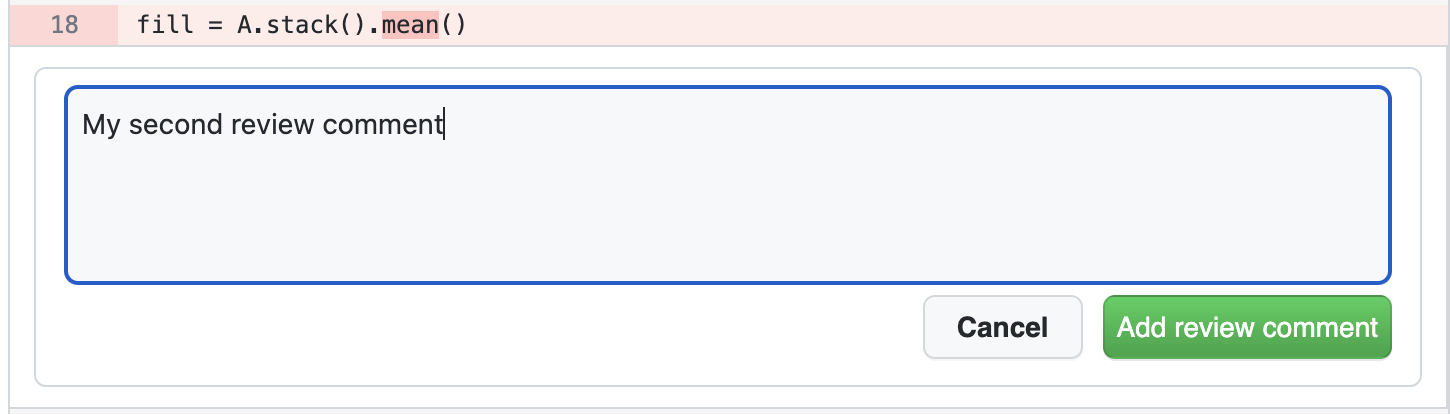
- Add comments throughout the notebook as needed.
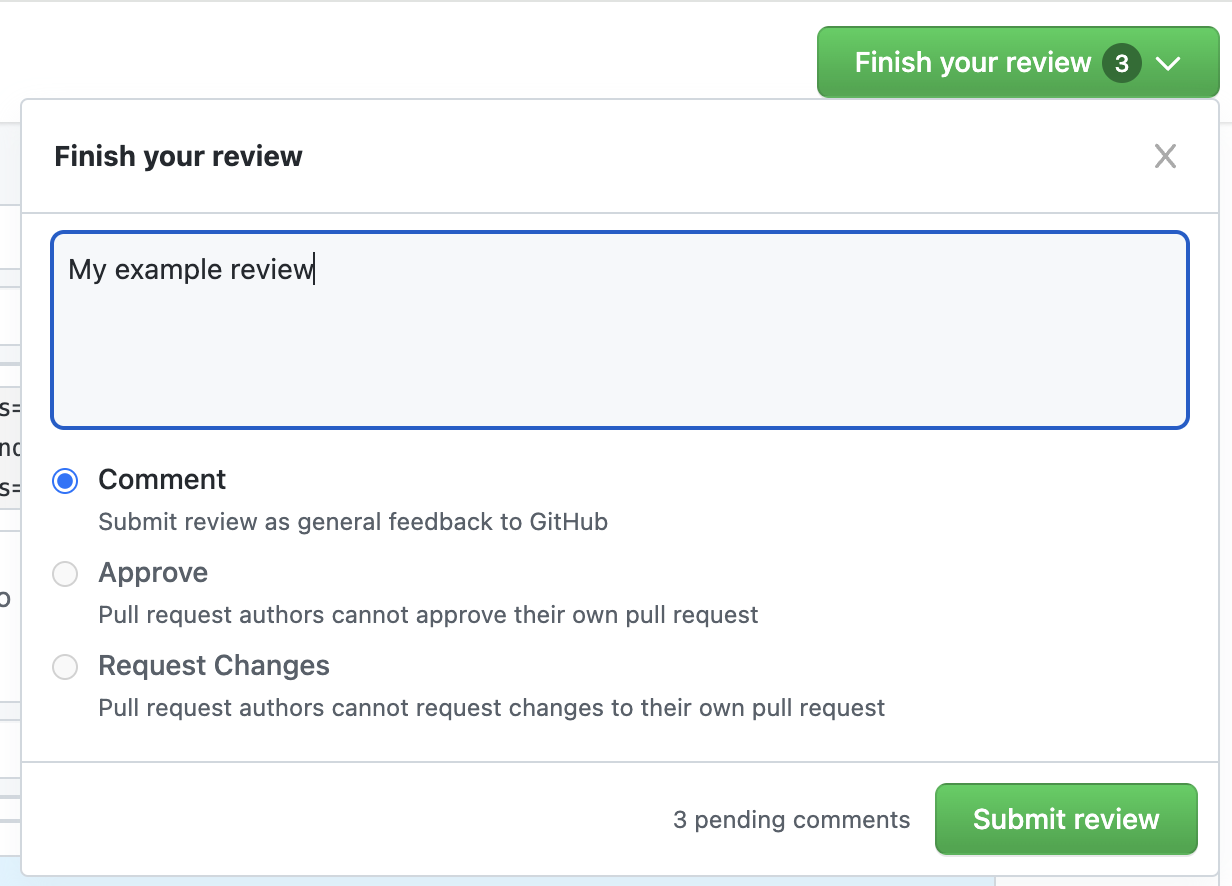
- When ready to submit your review, click "Finish your review".
- Choose to approve, reject, or leave a neutral review, similar to GitHub's review process.
After submitting your review, all your comments will be posted to GitHub automatically.
Step 1: Start a review
Step 2: Add comments
Step 3: Submit the review
GitHub Synchronization
- Single comments and posted review comments appear in GitHub.
- Responses to comments made within GitHub are visible in GitNotebooks.
- Conversation threads can be resolved in GitNotebooks, which stays in sync with conversation resolution in GitHub.
Security
At GitNotebooks, we take the security of your data and code seriously. This document outlines our security practices and explains the permissions we request.
Code Privacy
Your code never touches our servers.
Here's how it works:
- All files are fetched directly from GitHub to your browser
- Diffs are performed client-side in your browser
- We do not fetch, store, or process your code on our servers
GitHub Permissions
We request certain GitHub permissions to provide GitNotebooks functionality. Here's why we need each permission:
-
Repository (Read)
- Generate access tokens that allow your browser to fetch pull request files directly from GitHub
- Enable viewing and diffing of code within GitNotebooks
-
Repository (Write)
- Enable resolving conversations in pull requests
- We never write to your repositories for any other purpose
Note: We're actively tracking GitHub's progress on creating a separate, more limited permission for this functionality.
-
Pull Request (Write)
- Post comments on pull requests
- Submit reviews
-
Metadata (Read)
- Fetch pull request information (e.g., who opened it, current status)
- Display relevant context within GitNotebooks
Questions or Concerns?
If you have any questions about our security practices or the permissions we request, please don't hesitate to contact us at support@gitnotebooks.com.
Settings
Theme Selection
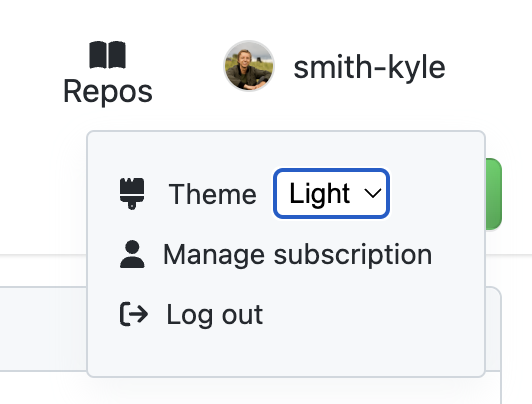
GitNotebooks has a dark mode.
To change the theme:
- Sign in
- Select your user avatar on the top right
- Choose a theme
Notebook Settings
To access notebook diff settings open the gear icon to the right of the pull request title.
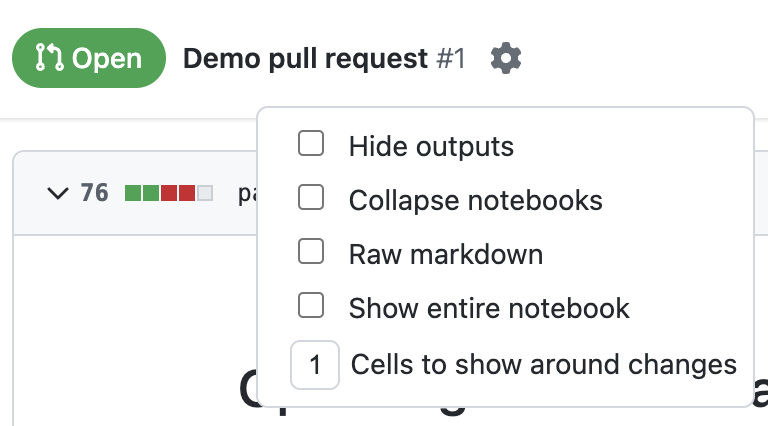
These settings will apply to all notebook diffs.
Hide Outputs
Enabling Hide Outputs will collapse all cell outputs.
Collapse Notebooks
Enabling Colapse Notebooks will collapse the notebooks by default. This can be helpful if you have a lot of changed notebooks to review and you'd rather see them one at a time.
Raw Markdown
Enabling Raw Markdown will show the markdown cells in their unrendered format.
Note that markdown comments will work for both rendered and unrendered markdown comments. If a comment is made to markdown in a rendered format they will appear in the unrendered view and vice versa.
Show Entire Notebooks
Enabling Show Entire Notebook will render the entire notebook, not just the changed cells. By default GitNotebooks will show
only the cells that have changed with a single cell above and below for context. The change this setting more precisely, see Cells to show around changes
Cells to show around changes
You can control how many unchanged cells appear above and below a changed cells. If you only want to see changed cells without their surrounding context,
set Cells to show around changes to 0.
Self Hosted Deployment Guide
This tutorial shows how to deploy GitNotebooks Self-Hosted
Before we start the tutorial
The tutorial is divided into several sections:
- Choosing an Endpoint
- Creating a GitHub App
- Creating a Database
- Reviewing the Environment Variables
- Deploy container
The goal is to create a set of environment variables that look like this:
BASE_URL=https://gitnotebooks.mycompany.com
GITHUB_BASE_URL=https://github.mycompany.com/api/v3
GITHUB_APP_IDENTIFIER=499732
GITHUB_CLIENT_SECRET=0f2e9190d598624847d2b259b5b567cf981d5072
GITHUB_PRIVATE_KEY=LS0tLS12dJQkFNB2s3emt2dBS0nRzbXQzVCRUdJUUVBc2pzNFRSb0ErUVdWdMbFZUeklyQmtkYkZFURSBTXZiZnlqQW9FHU0EgUFJJVk1YWZWUGxaV1NOKUTiBSbNi9HOUTV0YLRVktLS0tLQpCg==
GITHUB_WEBHOOK_SECRET=d1ae70aaf90bd909ce44927350d9aba8c1136d34
GITHUB_APP_URL=https://github.mycompany.com/apps/gitnotebooks-self-hosted
GITHUB_CLIENT_ID=Iv1.fed2b15afabbc1a6
DATABASE_URL=postgresql://postgres:somepassword@git-notebooks.database.url.rds.amazonaws.com:5432/postgres
AES_ENCRYPTION_KEY=X9CSf8y7Pw9dYSJNUwV4L7jUqH42/Mb27pHBRTUWceI=
ENTERPRISE=true
LICENSE_KEY=eg7d1aba4ddb88f2ec16711d96a25d0c03
In this tutorial, we'll denote environment variables with this notation: SOME_ENV_VAR
Once the environment variables are set correctly, you can run the GitNotebooks container. Here's an example using Docker:
docker run -p 80:3000 --env-file .env gitnotebooks/self-hosted:1.0.0
Prerequisites
We'll assume that you have enough permission to create a new GitHub app and a Postgres database. We'll also assume that you have access to the private GitNotebooks container image.
If you have not yet received the GitNotebooks container image, you can do so by filling out this form: Self-hosted signup
This is a multi-platform container image. So if you're pulling the image onto a machine with a different architecture than the one used in the deployment (e.g. to mirror the image to your own container registy), take care to make sure the correct platform is used when pulling the image, otherwise you will run into a exec format error.
# Example command to mirror image version 1.3.5 to a private container registry.

# linux/arm64
skopeo copy \
  --src-creds "$SRC_USER:$SRC_PASS" \
  --dest-creds "$DEST_USER:$DEST_PASS" \
  --override-os=linux \
  --override-arch=arm64 \
  docker://docker.io/gitnotebooks/self-hosted:1.3.5 \
  docker://registry.example.com/gitnotebooks/self-hosted:1.3.5-arm64

# linux/amd64
skopeo copy \
  --src-creds "$SRC_USER:$SRC_PASS" \
  --dest-creds "$DEST_USER:$DEST_PASS" \
  --override-os=linux \
  --override-arch=amd64 \
  docker://docker.io/gitnotebooks/self-hosted:1.3.5 \
  docker://registry.example.com/gitnotebooks/self-hosted:1.3.5-amd64
Choosing an Endpoint
The GitNotebooks web application needs to be accessible via a URL. This URL will be referred to as the BASE_URL throughout the setup process. You'll need to decide on this BASE_URL before proceeding.
The BASE_URL will be used as an environment variable in your configuration. For example, it might look like:
BASE_URL="https://gitnotebooks.yourcompanydomain.com"
Creating a GitHub App
First, navigate to your GitHub Organization > Settings > Developer Settings > GitHub Apps > New GitHub App. If you need help finding this button, the GitHub docs can help: Registering a GitHub App Here’s how to fill out the form:


You should now have a GitHub App with the following settings:
- GitHub App Name:
GitNotebooks - Homepage URL:
https://gitnotebook.com - Callback URL:
https://gitnotebooks.your-domain.com/api/auth/callback/github - Post installation:
https://gitnotebooks.your-domain.com/dashboard - Webhook URL:
https://gitnotebooks.your-domain.com/api/event_handler - Webhook secret: A custom webhook seceret
- Permissions
- Checks:
Read only - Contents:
Read and write - Pull requests:
Read and write - Email address:
Read only
- Checks:
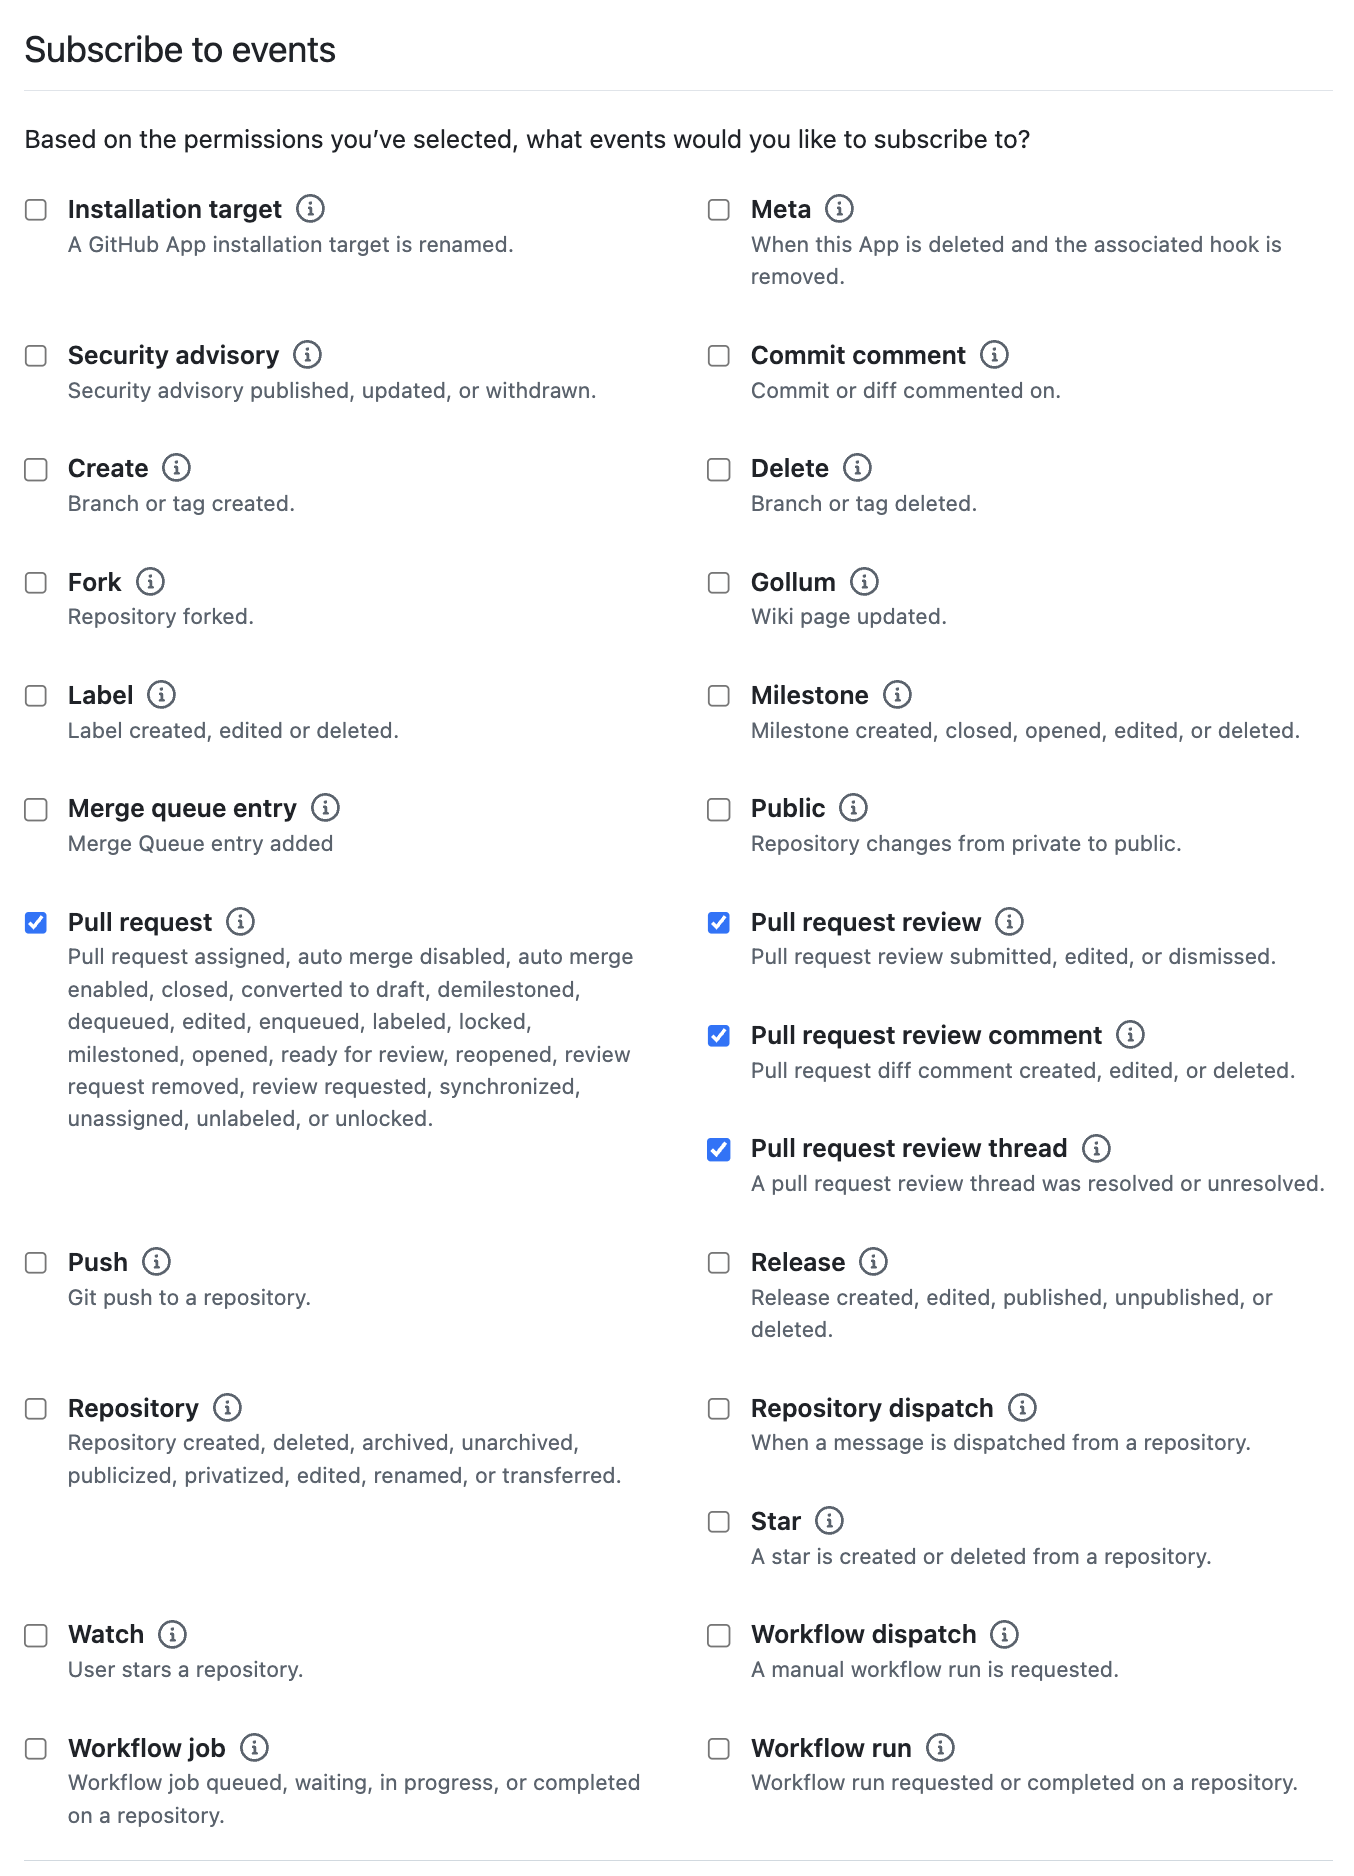
- Subscribe to events:
- Pull request
- Pull request review
- Pull request review comment
- Pull request review thread
After creating the GitHub App
We'll need to collect some information for GitNotebooks to identify itself as the GitHub App.
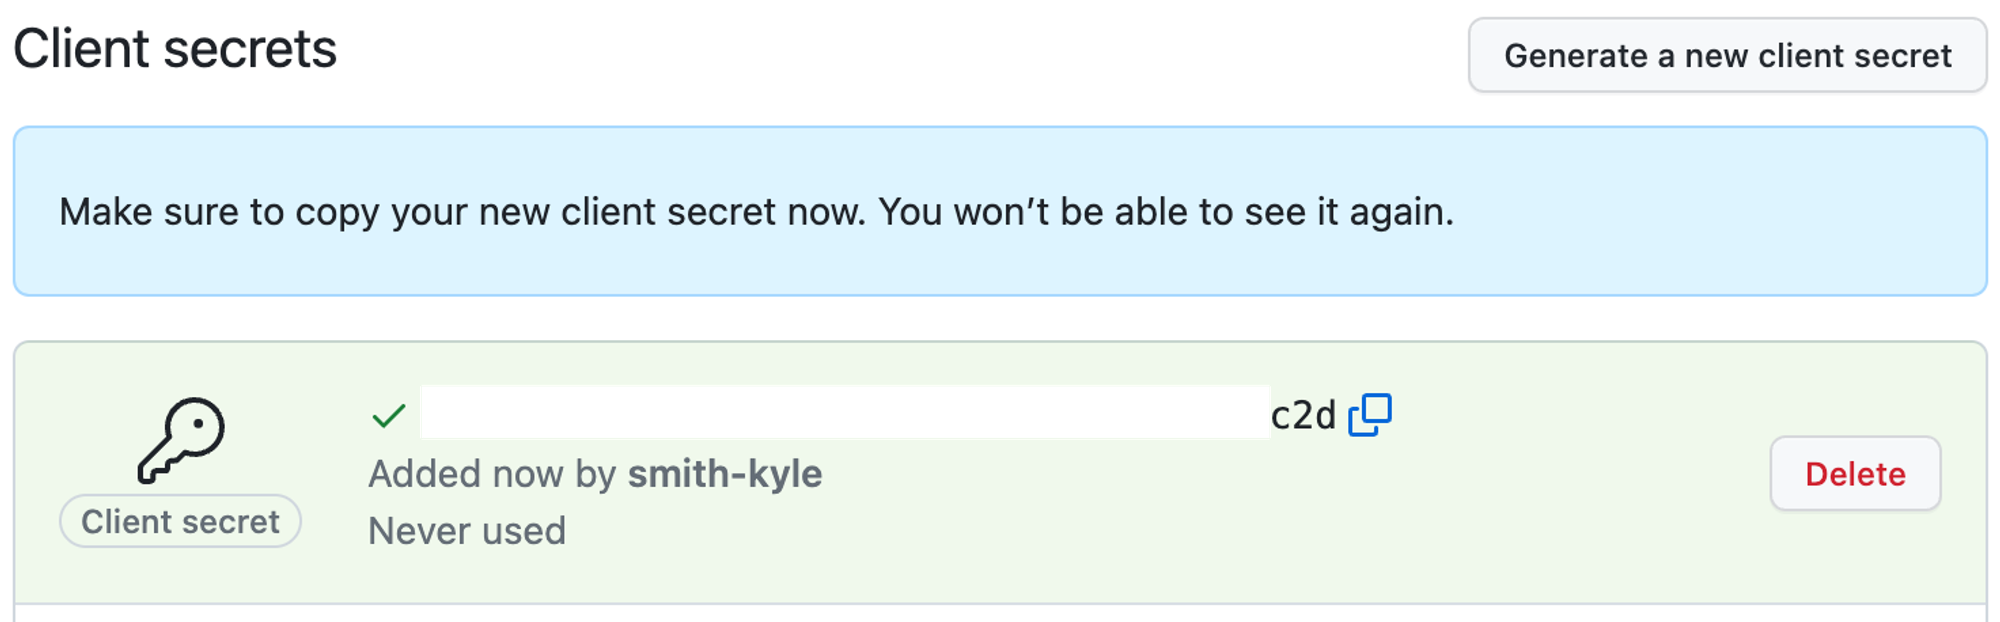
Generate a new client secret GITHUB_CLIENT_SECRET
Generate a private key We will download the key, then convert it to base64.
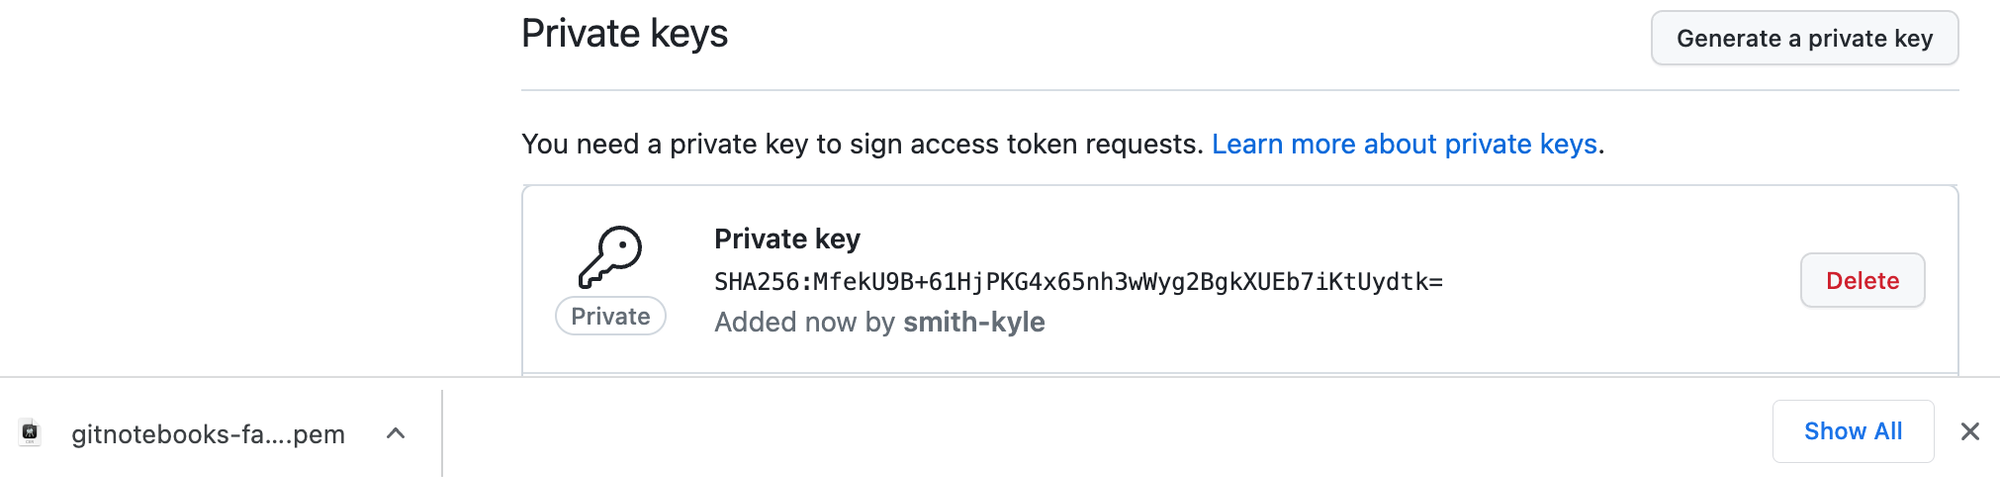
Convert the key to base64.
cat path/to/your/key.pem | base64
Note the url of the public page GITHUB_APP_URL
This URL is used to direct users to add repos to the GitHub app installation.

Making it pretty (optional)
Finally, you can upload a logo which is used as the app's avatar.
Creating a database
Next, we need a Postgres database with the following specifications:
- 1GB RAM
- 20GiB storage
- PostgreSQL 9.4 or higher
- Username/Password authentication
We recommend that your database not be accessible to the internet, and restrict inbound connections to the web servers hosting the container over TCP port 5432.
Note the connection string, which is the DATABASE_URL
DATABASE_URL="postgresql://USER:PASSWORD@HOST:PORT/DATABASE"
GitHub Enterprise Server Considerations
User avatars may not be visible for GitHub Enterprise Server users due to a limitation of GitHub: GitHub Issue.
However, you can use initial instead of avatars by setting the USE_INITIALS_FOR_AVATARS=true environment variable.
Reviewing the Environment Variables
We should have all the environment variables we need:
# From `Choosing and Endpoint`
BASE_URL=https://gitnotebooks.mycompany.com

# From `Creating a GitHub App`
GITHUB_APP_IDENTIFIER=499732
GITHUB_CLIENT_ID=Iv1.fed2b15afabbc1a6
GITHUB_CLIENT_SECRET=0f2e9190d598624847d2b259b5b567cf981d5072
GITHUB_PRIVATE_KEY=LS0tLS12dJQkFNB2s3emt2dBS0nRzbXQzVCRUdJUUVBc2pzNFRSb0ErUVdWdMbFZUeklyQmtkYkZFURSBTXZiZnlqQW9FHU0EgUFJJVk1YWZWUGxaV1NOKUTiBSbNi9HOUTV0YLRVktLS0tLQpCg==
GITHUB_WEBHOOK_SECRET=d1ae70aaf90bd909ce44927350d9aba8c1136d34
GITHUB_APP_URL=https://github.mycompany.com/apps/gitnotebooks-self-hosted

# Base URL of your GitHub API. If you are not self-hosting GitHub, simply use https://api.github.com
# If you are using GitHub Enterprise Server use https://mycompany.github.com/api/v3
GITHUB_BASE_URL=https://api.github.com

# From `Creating a database`
DATABASE_URL=postgresql://postgres:somepassword@git-notebooks.database.url.rds.amazonaws.com:5432/postgres

# Generate this value using `openssl rand -base64 32`
AES_ENCRYPTION_KEY=X9CSf8y7Pw9dYSJNUwV4L7jUqH42/Mb27pHBRTUWceI=

# License keys are provided by GitNotebooks
LICENSE_KEY=eg7d1aba4ddb88f2ec16711d96a25d0c03

ENTERPRISE=true
You are now ready to deploy GitNotebooks Self-Hosted.
Deploying the GitNotebooks Container
The final step is to deploy the GitNotebooks container image with the environment variables we've prepared. Here are some key points to consider:
- The container image serves traffic over port 3000, which should be mapped to port 80 on the host.
- A health check endpoint is available at
/api/health. This endpoint verifies the web application's connection to the database and confirms that the environment variables are properly set. - We recommend a resource request of
250Mimemory100mCPU. We also recommend not setting CPU and memory limits to allow for increased CPU during redeployments.
To deploy the container, use your preferred container orchestration platform (e.g., ECS, Kubernetes) and ensure that the necessary port mapping, environment variables, and CPU/memory requests are configured.
Security Recommendations
While GitNotebooks Self-Hosted only makes network requests to GitHub, we recommend implementing the following security measures:
-
Web application servers:
- Store container environment variables as secrets (e.g., using AWS Secrets Manager)
- Restrict outbound network traffic to GitHub and the database
- Limit inbound traffic to your corporate VPN
-
Database:
- Implement encryption at rest
- Require SSL connections from the web server
- Restrict inbound connections to web servers via TCP port 5432
- Disable all outbound network requests
-
Application load balancer:
- Limit inbound requests to your corporate VPN and GitHub Webhooks
- Restrict outbound requests to the web application
Self Hosted Deployment Guide
This tutorial shows how to deploy GitNotebooks Self-Hosted
Before we start the tutorial
The tutorial is divided into several sections:
- Choosing an Endpoint
- Creating a GitHub App
- Creating a Database
- Reviewing the Environment Variables
- Deploy container
The goal is to create a set of environment variables that look like this:
BASE_URL=https://gitnotebooks.mycompany.com
GITHUB_BASE_URL=https://github.mycompany.com/api/v3
GITHUB_APP_IDENTIFIER=499732
GITHUB_CLIENT_SECRET=0f2e9190d598624847d2b259b5b567cf981d5072
GITHUB_PRIVATE_KEY=LS0tLS12dJQkFNB2s3emt2dBS0nRzbXQzVCRUdJUUVBc2pzNFRSb0ErUVdWdMbFZUeklyQmtkYkZFURSBTXZiZnlqQW9FHU0EgUFJJVk1YWZWUGxaV1NOKUTiBSbNi9HOUTV0YLRVktLS0tLQpCg==
GITHUB_WEBHOOK_SECRET=d1ae70aaf90bd909ce44927350d9aba8c1136d34
GITHUB_APP_URL=https://github.mycompany.com/apps/gitnotebooks-self-hosted
GITHUB_CLIENT_ID=Iv1.fed2b15afabbc1a6
DATABASE_URL=postgresql://postgres:somepassword@git-notebooks.database.url.rds.amazonaws.com:5432/postgres
AES_ENCRYPTION_KEY=X9CSf8y7Pw9dYSJNUwV4L7jUqH42/Mb27pHBRTUWceI=
ENTERPRISE=true
LICENSE_KEY=eg7d1aba4ddb88f2ec16711d96a25d0c03
In this tutorial, we'll denote environment variables with this notation: SOME_ENV_VAR
Once the environment variables are set correctly, you can run the GitNotebooks container. Here's an example using Docker:
docker run -p 80:3000 --env-file .env gitnotebooks/self-hosted:1.0.0
Prerequisites
We'll assume that you have enough permission to create a new GitHub app and a Postgres database. We'll also assume that you have access to the private GitNotebooks container image.
If you have not yet received the GitNotebooks container image, you can do so by filling out this form: Self-hosted signup
This is a multi-platform container image. So if you're pulling the image onto a machine with a different architecture than the one used in the deployment (e.g. to mirror the image to your own container registy), take care to make sure the correct platform is used when pulling the image, otherwise you will run into a exec format error.
# Example command to mirror image version 1.3.5 to a private container registry.

# linux/arm64
skopeo copy \
  --src-creds "$SRC_USER:$SRC_PASS" \
  --dest-creds "$DEST_USER:$DEST_PASS" \
  --override-os=linux \
  --override-arch=arm64 \
  docker://docker.io/gitnotebooks/self-hosted:1.3.5 \
  docker://registry.example.com/gitnotebooks/self-hosted:1.3.5-arm64

# linux/amd64
skopeo copy \
  --src-creds "$SRC_USER:$SRC_PASS" \
  --dest-creds "$DEST_USER:$DEST_PASS" \
  --override-os=linux \
  --override-arch=amd64 \
  docker://docker.io/gitnotebooks/self-hosted:1.3.5 \
  docker://registry.example.com/gitnotebooks/self-hosted:1.3.5-amd64
Choosing an Endpoint
The GitNotebooks web application needs to be accessible via a URL. This URL will be referred to as the BASE_URL throughout the setup process. You'll need to decide on this BASE_URL before proceeding.
The BASE_URL will be used as an environment variable in your configuration. For example, it might look like:
BASE_URL="https://gitnotebooks.yourcompanydomain.com"
Creating a GitHub App
First, navigate to your GitHub Organization > Settings > Developer Settings > GitHub Apps > New GitHub App. If you need help finding this button, the GitHub docs can help: Registering a GitHub App Here’s how to fill out the form:
You should now have a GitHub App with the following settings:
- GitHub App Name:
GitNotebooks - Homepage URL:
https://gitnotebook.com - Callback URL:
https://gitnotebooks.your-domain.com/api/auth/callback/github - Post installation:
https://gitnotebooks.your-domain.com/dashboard - Webhook URL:
https://gitnotebooks.your-domain.com/api/event_handler - Webhook secret: A custom webhook seceret
- Permissions
- Checks:
Read only - Contents:
Read and write - Pull requests:
Read and write - Email address:
Read only
- Checks:
- Subscribe to events:
- Pull request
- Pull request review
- Pull request review comment
- Pull request review thread
After creating the GitHub App
We'll need to collect some information for GitNotebooks to identify itself as the GitHub App.
Generate a new client secret GITHUB_CLIENT_SECRET
Generate a private key We will download the key, then convert it to base64.
Convert the key to base64.
cat path/to/your/key.pem | base64
Note the url of the public page GITHUB_APP_URL
This URL is used to direct users to add repos to the GitHub app installation.
Making it pretty (optional)
Finally, you can upload a logo which is used as the app's avatar.
Creating a database
Next, we need a Postgres database with the following specifications:
- 1GB RAM
- 20GiB storage
- PostgreSQL 9.4 or higher
- Username/Password authentication
We recommend that your database not be accessible to the internet, and restrict inbound connections to the web servers hosting the container over TCP port 5432.
Note the connection string, which is the DATABASE_URL
DATABASE_URL="postgresql://USER:PASSWORD@HOST:PORT/DATABASE"
GitHub Enterprise Server Considerations
User avatars may not be visible for GitHub Enterprise Server users due to a limitation of GitHub: GitHub Issue.
However, you can use initial instead of avatars by setting the USE_INITIALS_FOR_AVATARS=true environment variable.
Reviewing the Environment Variables
We should have all the environment variables we need:
# From `Choosing and Endpoint`
BASE_URL=https://gitnotebooks.mycompany.com

# From `Creating a GitHub App`
GITHUB_APP_IDENTIFIER=499732
GITHUB_CLIENT_ID=Iv1.fed2b15afabbc1a6
GITHUB_CLIENT_SECRET=0f2e9190d598624847d2b259b5b567cf981d5072
GITHUB_PRIVATE_KEY=LS0tLS12dJQkFNB2s3emt2dBS0nRzbXQzVCRUdJUUVBc2pzNFRSb0ErUVdWdMbFZUeklyQmtkYkZFURSBTXZiZnlqQW9FHU0EgUFJJVk1YWZWUGxaV1NOKUTiBSbNi9HOUTV0YLRVktLS0tLQpCg==
GITHUB_WEBHOOK_SECRET=d1ae70aaf90bd909ce44927350d9aba8c1136d34
GITHUB_APP_URL=https://github.mycompany.com/apps/gitnotebooks-self-hosted

# Base URL of your GitHub API. If you are not self-hosting GitHub, simply use https://api.github.com
# If you are using GitHub Enterprise Server use https://mycompany.github.com/api/v3
GITHUB_BASE_URL=https://api.github.com

# From `Creating a database`
DATABASE_URL=postgresql://postgres:somepassword@git-notebooks.database.url.rds.amazonaws.com:5432/postgres

# Generate this value using `openssl rand -base64 32`
AES_ENCRYPTION_KEY=X9CSf8y7Pw9dYSJNUwV4L7jUqH42/Mb27pHBRTUWceI=

# License keys are provided by GitNotebooks
LICENSE_KEY=eg7d1aba4ddb88f2ec16711d96a25d0c03

ENTERPRISE=true
You are now ready to deploy GitNotebooks Self-Hosted.
Deploying the GitNotebooks Container
The final step is to deploy the GitNotebooks container image with the environment variables we've prepared. Here are some key points to consider:
- The container image serves traffic over port 3000, which should be mapped to port 80 on the host.
- A health check endpoint is available at
/api/health. This endpoint verifies the web application's connection to the database and confirms that the environment variables are properly set. - We recommend a resource request of
250Mimemory100mCPU. We also recommend not setting CPU and memory limits to allow for increased CPU during redeployments.
To deploy the container, use your preferred container orchestration platform (e.g., ECS, Kubernetes) and ensure that the necessary port mapping, environment variables, and CPU/memory requests are configured.
Security Recommendations
While GitNotebooks Self-Hosted only makes network requests to GitHub, we recommend implementing the following security measures:
-
Web application servers:
- Store container environment variables as secrets (e.g., using AWS Secrets Manager)
- Restrict outbound network traffic to GitHub and the database
- Limit inbound traffic to your corporate VPN
-
Database:
- Implement encryption at rest
- Require SSL connections from the web server
- Restrict inbound connections to web servers via TCP port 5432
- Disable all outbound network requests
-
Application load balancer:
- Limit inbound requests to your corporate VPN and GitHub Webhooks
- Restrict outbound requests to the web application
Self Hosted Release Notes
gitnotebooks/self-hosted:1.3.1
- Bug Fixes
- Fixed a regression where a user would see "An error has occurred" when the user's auth token had expired. Now you will be redirected to the sign in page to refresh the token.
gitnotebooks/self-hosted:1.3.0
- Features
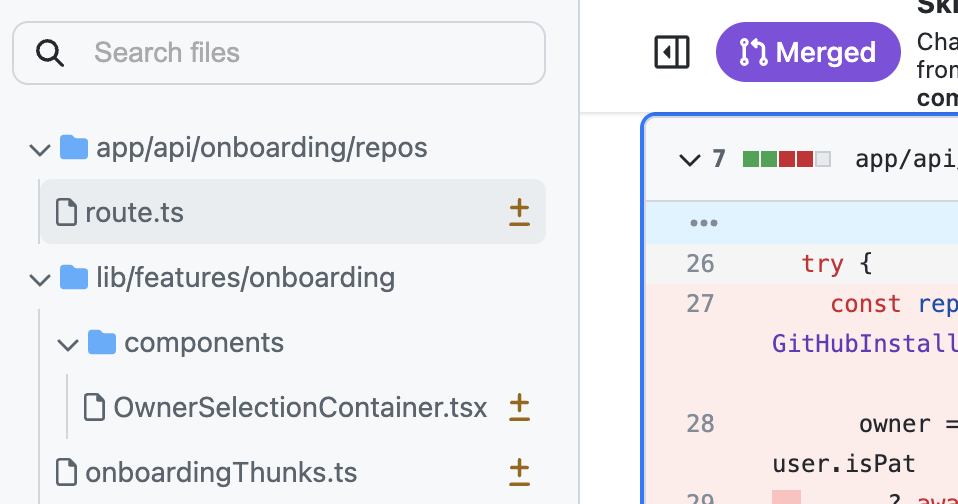
- Added a file tree view to quickly hop from file to file
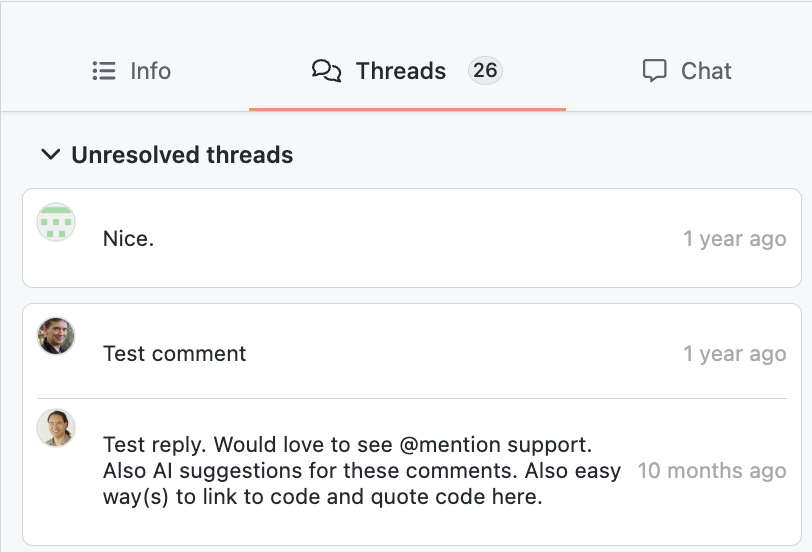
- Added a threads list to the right panel so that you can quickly see all of the added comments in the pull request and navigate to them quickly
- The old dashboard has been replaced with a pull request inbox. From the inbox you can see all of the pull request that you care about, and customize which PRs are shown.
- Added keyboard shortcuts to jump between files and diffs
- Added a file tree view to quickly hop from file to file
gitnotebooks/self-hosted:1.2.4
- Bug Fixes
- Improved license check to reduce the amount of phone home requests made, and lessen the CPU usage for these license checks
gitnotebooks/self-hosted:1.2.3
- Bug Fixes
- Fixed an issue with reply comments. If someone replied to a comment within GitNotebooks on a file that's not a Jupyter Notebook, the parent comment's text would be used for the comment body rather than the comment typed out by the user.
gitnotebooks/self-hosted:1.2.2
- Features
- Added a new environment variable
USE_INITIALS_FOR_AVATARS. When set totrue, the app will not use GitHub avatars. Instead, it will create initials using the GitHub username and assign a randomized background color. This feature was added to address a much discussed shortcoming of the GitHub Enterprise Server API which breaks user avatar links.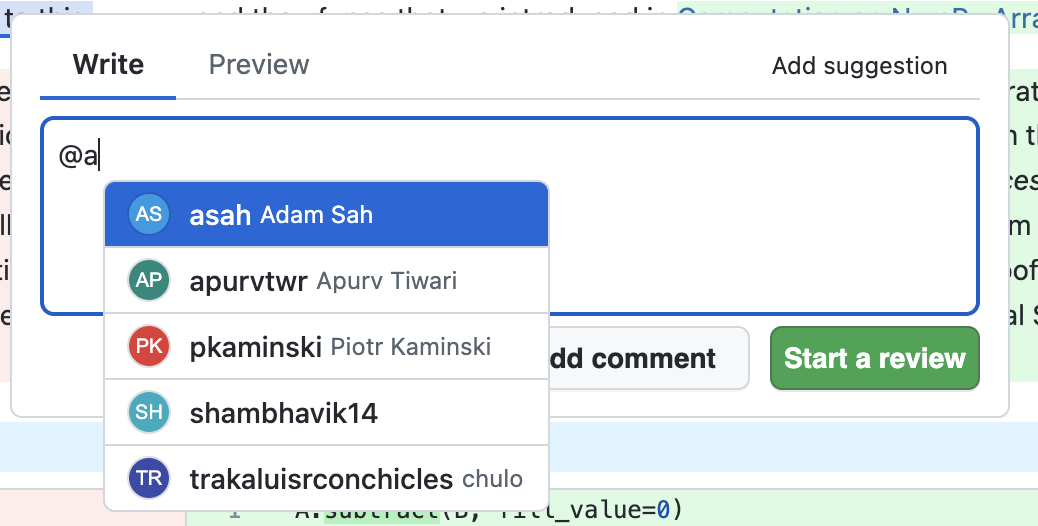
- Added a new environment variable
- Security
- Upgraded Next.js to
15.2.3to patch a middleware bypass vulnerability. GitNotebooks was not affected by this vulnerability, but we may use middleware in the future.
- Upgraded Next.js to
gitnotebooks/self-hosted:1.2.1
-
Features
- Bi-directional comment syncing between GitHub and GitNotebooks. If a comment is posted in GitNotebooks, it will be cross-posted to the corresponding JSON line in GitHub. If a comment is posted in GitHub, it will be shown in the corresponding rendered notebook line. Syncs comment edit and delete as well
- Ability to "Add suggestion" to a notebook or code file and then apply the change within GitHub
- Added a repo file explorer similar to a repo's home page in GitHub to allow notebook reviewers to quickly check python modules referenced from a notebook
- Log more events and improved readability of server logs:
INFO,WARN,ERROR, instead of30,40,50 - View self hosted license information from the app home page: number of seats, expiration, license type
-
Bug Fixes
- File renames are now handled better. Comments used to disappear if they were posted to a renamed file and then a subsequent change was pushed to that notebook. This, and other edge cases related to rename behavior, has been fixed
Required Changes: In order to upgrade to version 1.2.1 there are four requirements
- Set a new environment variables
LICENSE_KEY- Allow egress from the GitNotebooks service to https://license.gitnotebooks.com
- Set the
GITHUB_BASE_URLto the url of the GitHub API e.g.https://api.github.comfor GitHub Enterprise Cloud. For GitHub Enterprise Server usehttps://${CUSTOM_GITHUB_DOMAIN}/api/v3- Modify the GitNotebooks GitHub App to subcribe to the following events
- Pull request review
- Pull request review comment
- Pull request review threadPull request thread comment
GitNotebooks Enterprise Security
This page offers an overview of GitNotebooks security-related features. Note that while there are many ways to configure GitNotebooks we'll only discuss the most secure configuration here.
Everything on this page applies to both self-hosted and managed Enterprise instances. A managed instance is just a self-hosted instance that we run for you (outside your VPN), configured as follows:
- GitNotebooks web application servers and image storage run in AWS.
- All secrets are stored in AWS Secret Manager, with audit trails enabled.
- All data is stored in RDS with TLS communication required, data encypted at rest, not internet-facing
Architecture
This is the recommended architecture for a self-hosted deployment, which is also used for the managed Enterprise instances. The diagram summarizes the various components and how they communicate:
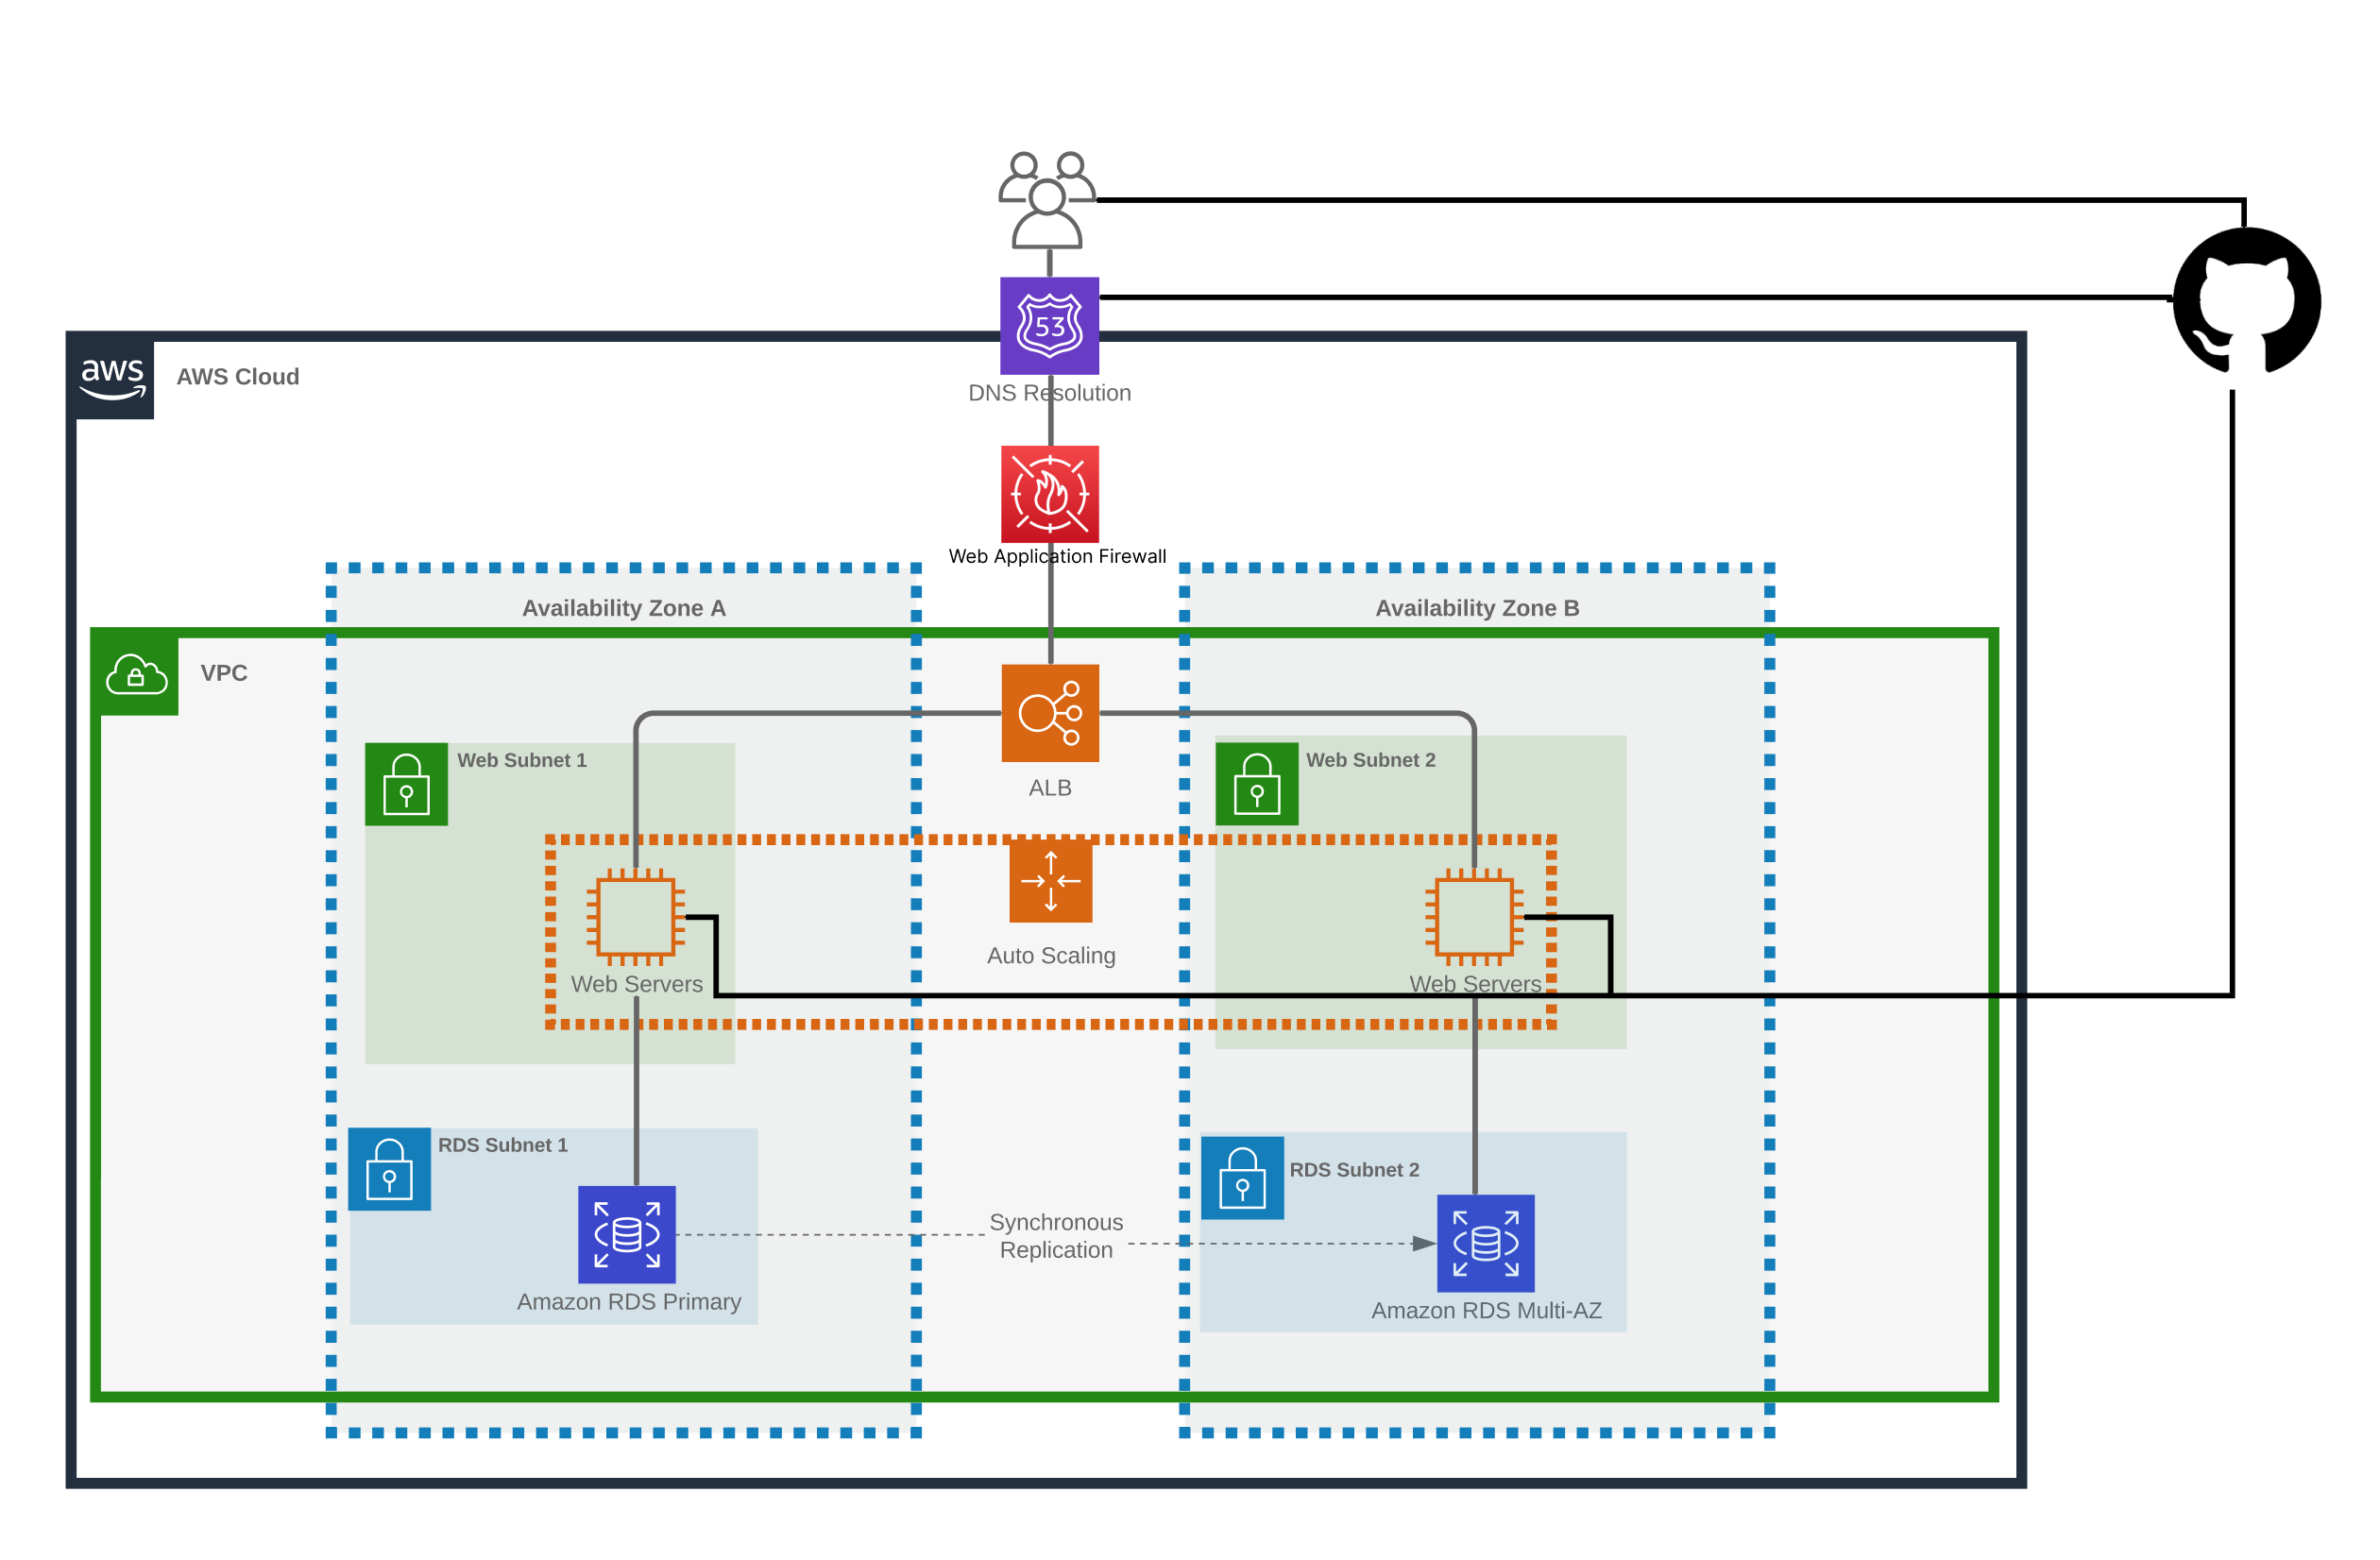
If using GitHub Enterprise Server, all network traffic remains within your corporate VPN.
Note: While we replicate the deployment across two Availability Zones for Managed Enterprise accounts, this is not strictly necessary for Self-Hosted.
Network Security
This is the recommended network security configuration for a self-hosted deployment, which is also used for the managed Enterprise instances. The table summarizes the inbound/outbound rules for each components as well as their internet configuration. In the case of Self-Hosted with GitHub Server, the application load balancer should not be internet facing, and only accept requests within the corporate VPN.
| Service | Inbound | Outbound | Internet-Facing | Internet Access |
|---|---|---|---|---|
| Application Load Balancer | TCP:80 (redirect to 443) TCP:443 GitHub and Corporate VPN | TCP:3000 Web application security group | Yes | N/A |
| Web application instance | TCP:3000 ALB security group | TCP:443 GitHub TCP:443 Bugsnag | No | Yes |
| RDS Postgres | TCP:5432 Web application security group | None | No | No |
Data Encryption
Data Encyption At Rest
There are two pieces of sensitive data stored by the application. Both are AES encypted at rest:
- GitHub Auth Tokens
- Comment Body
In the case of self-hosted, the encyption key is generated by you. It's recommended that this key be stored in a secrets manager and mounted into the container image by reference.
Data Encyption in Transit
For Managed Enterprise accounts, the following components use TLS encyption:
- Application Load Balancer
- Database
- GitHub Enterprise
It is recommended that network traffic be encrypted similarly for self-hosted deployments.
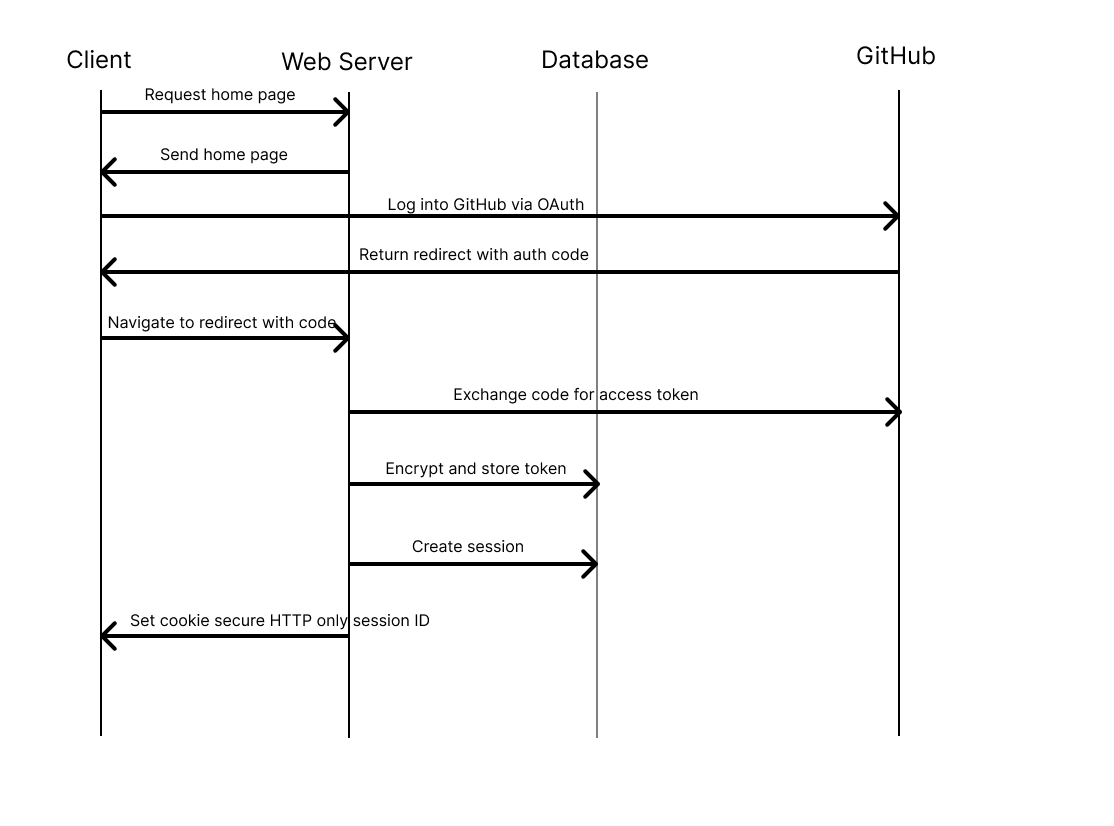
Authentication
GitNotebooks relies entirely on GitHub Enterprise (GHE) for authentication. If you've configured your GHE instance to use SSO via SAML then GitNotebooks will use that too. There are no separate local user accounts to maintain within Gitnotebooks.
When a user signs in, GitNotebooks obtains and stores an OAuth token that lets it operatore on the user's behalf within the scopes that were granted. GitNotebooks needs the following scopes:
- Repo (read and write)
- Pull requests (write)
- Metadata (read and write)
Authorization
Authorizations in GitNotebooks are inferred from the permissions granted to users in GHE, i.e. repository read/write/admin and organization owner. There are no separate roles or authorizations maintained within GitNotebooks.
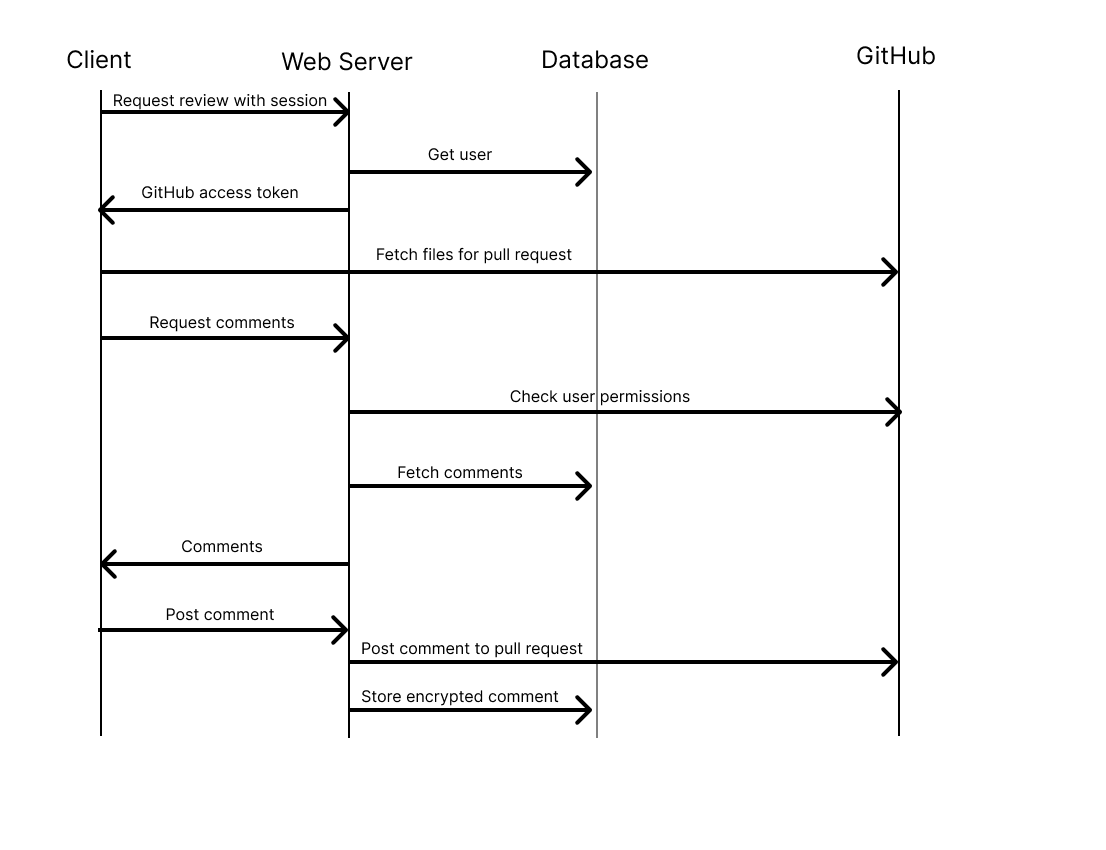
Data Flow
The following diagrams illustrate the two primary workflows of GitNotebooks
Frequently Asked Questions
Does the self-hosted application send any network requests to GitNotebooks?
Yes, as of version 1.1.0 self-hosted installations make a network request once per day to our license server to ensure that the customer has an authorized installation of GitNotebooks.
Does GitNotebooks have access to any Self Hosted data?
No, all data is stored within your own cloud environment. GitNotebooks does not have access to any of your data.